Reverse-Engineering the Intel 8087 Stack Circuitry
Although something that’s taken for granted these days, the ability to perform floating-point operations in hardware was, for the longest time, something reserved for people with big wallets. This began to change around the time that Intel released the 8087 FPU coprocessor in 1980, featuring hardware support for floating-point arithmetic at a blistering 50 KFLOPS. Notably, the 8087 uses a stack-based architecture, a major departure from existing FPUs. Recently [Ken Shirriff] took a literal closer look at this stack circuitry to see what it looks like and how it works.
Nearly half of the 8087’s die is taken up by the microcode frontend and bus controller, with a block containing constants like π alongside the FP calculation-processing datapath section taking up much of the rest. Nestled along the side are the eight registers and the stack controller. At 80 bits per FP number, the required registers and related were pretty sizeable for the era, especially when you consider that the roughly 60,000 transistors in the 8087 were paired alongside the 29,000 transistors in the 16-bit 8086.
Each of the 8087’s registers is selected by the decoded instructions via a lot of wiring that can still be fairly easily traced despite the FPU’s die being larger than the CPU it accompanied. As for the unique stack-based register approach, this turned out to be mostly a hindrance, and the reason why the x87 FP instructions in the x86 ISA are still quite maligned today. Yet with careful use, providing a big boost over traditional code, this made it a success by that benchmark, even if MMX, SSE, and others reverted to a stackless design.
hackaday.com/2025/12/19/revers…
Improving the Cloud Chamber
Want to visualize radioactive particles? You don’t need a boatload of lab equipment. Just a cloud chamber. And [Curious Scientist] is showing off an improved miniature cloud chamber that is easy to replicate using a 3D printer and common components.
The build uses a Peltier module, a CPU cooler, an aluminum plate, thermal paste, and headlight film. The high voltage comes from a sacrificed mosquito swatter. The power input for the whole system is any 12V supply.
The cloud chamber was high tech back in 1911 when physicist Charles T. R. Wilson made ionizing radiation visible by creating trails of tiny liquid droplets in a supersaturated vapor of alcohol or water. Charged particles pass through, leaving visible condensation trails.
According to the post, the cost of everything is under $100. He hasn’t made the 3D printed parts freely available, but there are enough pictures that you can probably work it out yourself. Besides, you’d almost certainly have to rework it for your particular jar, anyway.
After all, a cloud chamber’s construction isn’t a state secret. We’ve seen some fancy Peltier-based designs. If you manage your expectations, you can build one for even less using a plastic bottle and ingenuity.
hackaday.com/2025/12/19/improv…
915 MHz Forecast: Rolling Your Own Offline Weather Station
There are a lot of options for local weather stations; most of them, however, are sensors tied to a base station, often requiring an internet connection to access all features. [Vinnie] over at vinthewrench has published his exploration into an off-grid weather station revolving around a Raspberry Pi and an RTL-SDR for communications.
The weather station has several aspects to it. The main sensor package [Vinnie] settled on was the Ecowitt WS90, capable of measuring wind speed, wind direction, temperature, humidity, light, UVI, and rain amount. The WS90 communicates at 915 MHz, which can be read using the rtl_433 project. The WS90 is also available for purchase as a standalone sensor, allowing [Vinnie] to implement his own base station.
For the base station, [Vinnie] uses a weatherproof enclosure that houses a 12V battery with charger to act as a local UPS. This powers the brains of the operation: a Raspberry Pi. Hooked to the Pi is an RTL-SDR with a 915 MHz antenna. The Pi receives an update from the WS90 roughly every 5 seconds, which it can decode using the rtl_433 library. The Pi then turns that packet into structured JSON.
The JSON is fed into a weather model backend that handles keeping track of trends in the sensor data, as well as the health of the sensor station. The backend has an API that allows for a dashboard weather site for [Vinnie], no internet required.
Thanks, [Vinnie], for sending in your off-grid weather station project. Check out his site to read more about his process, and head over to the GitHub page to check out the technical details of his implementation. This is a great addition to some of the other DIY weather stations we’ve featured here.
hackaday.com/2025/12/19/915-mh…
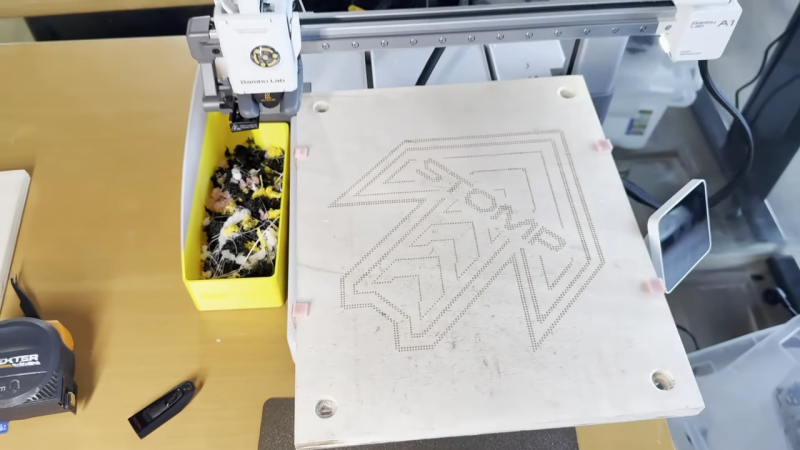
Cheap 3D Printer Becomes CNC Wood Engraver
3D printers are built for additive manufacturing. However, at heart, they are really just simple CNC motion platforms, and can be readily repurposed to other tasks. As [Arseniy] demonstrates, it’s not that hard to take a cheap 3D printer and turn it into a viable wood engraver.
The first attempt involved a simple experiment—heating the 3D printer nozzle, and moving it into contact with a piece of wood to see if it could successfully leave a mark. This worked well, producing results very similar to a cheap laser engraving machine. From there, [Arseniy] set about fixing the wood with some simple 3D-printed clamps so it wouldn’t move during more complex burning/engraving tasks. He also figured out a neat trick to simply calibrate the right Z height for wood burning by using the built in calibration routines. Further experiments involved developing a tool for creating quality G-Code for these engraving tasks, and even using the same techniques on leather with great success.
If you need to mark some patterns on wood and you already have a 3D printer, this could be a great way to go. [Arseniy] used it to great effect in the production of a plywood dance pad. We’ve featured some other great engraver builds over the years, too, including this innovative laser-based project. Video after the break.
youtube.com/embed/WcHOnkO5-Sg?…
hackaday.com/2025/12/19/cheap-…
Un bambino, una mutazione, un algoritmo: così l’AI ha sconfitto una malattia mortale
Solo un anno fa, i medici non potevano dire con certezza se KJ Muldoon sarebbe sopravvissuto al suo primo anno di vita. Oggi sta muovendo i primi passi a casa, con la sua famiglia al suo fianco.
Questa svolta è stata resa possibile da una soluzione medica che fino a poco tempo fa era solo teorica: la terapia genica personalizzata basata sulla tecnologia CRISPR, sviluppata specificamente per ogni paziente.
E tutto quanto si basa su modelli di intelligenza artificiale che consentono di effettuare quello che si chiama “Editing Genetico”.
Editing Genetico Personalizzato. L’AI che ci piace
Prima di parlare di questa storia, vogliamo spiegare cos’è il CRISPR, acronimo di Clustered Regularly Interspaced Short Palindromic Repeats: una tecnologia di editing genetico derivata da un meccanismo di difesa naturale dei batteri contro i virus. In pratica, CRISPR funziona come un sistema di taglio e correzione del DNA: una proteina (come Cas9) viene guidata verso un punto preciso del genoma, dove può tagliare una sequenza difettosa e permettere alla cellula di ripararla o sostituirla con una versione corretta. Questo approccio consente di intervenire direttamente sulla causa genetica di una malattia, rendendo possibile una medicina di precisione che non si limita a curare i sintomi, ma modifica l’origine stessa del problema.
L’intelligenza artificiale è uno degli elementi chiave che rende possibile l’editing genetico personalizzato. Prima ancora che CRISPR venga utilizzato, l’AI analizza enormi quantità di dati genomici per identificare con precisione la mutazione responsabile della malattia, distinguendo gli errori critici da variazioni genetiche innocue. In tempi estremamente ridotti, gli algoritmi confrontano il DNA del paziente con database globali, simulano gli effetti delle modifiche e aiutano a progettare le sequenze guida di CRISPR più efficaci, riducendo al minimo il rischio di interventi fuori bersaglio. Senza questo livello di analisi automatizzata, una terapia costruita su misura per un singolo bambino sarebbe semplicemente impraticabile.
Il contributo dell’AI non si ferma alla progettazione della terapia. I modelli predittivi vengono utilizzati per stimare la sicurezza dell’intervento, definire il dosaggio più appropriato e prevedere come l’organismo potrebbe reagire nel tempo. Dopo il trattamento, l’AI supporta il monitoraggio clinico continuo, aiutando i medici a interpretare i dati biologici e a individuare precocemente eventuali segnali di rischio. In questo contesto, l’intelligenza artificiale non sostituisce i medici, ma diventa uno strumento decisivo per trasformare una cura sperimentale in una reale possibilità di vita.
L’Editing genetico e la malattia di KJ
All’inizio dell’anno, i medici del Children’s Hospital di Philadelphia hanno somministrato un trattamento che all’epoca non aveva equivalenti clinici. Hanno creato un editing genomico personalizzato per KJ, mirato a una rara malattia metabolica congenita. Tali disturbi derivano da difetti nei geni responsabili di processi biochimici chiave. Nei neonati, spesso portano a gravi complicazioni e, in alcuni casi, sono fatali nei primi mesi di vita.
KJ è stata la prima persona a ricevere una terapia genica progettata non per un gruppo di pazienti, ma per una mutazione specifica in un singolo bambino. Prima del trattamento, la sua vita veniva trascorsa quasi interamente nei reparti ospedalieri, sotto costante osservazione e monitoraggio 24 ore su 24. Dopo l’intervento, le condizioni del bambino si sono stabilizzate al punto che i medici sono stati in grado di interrompere gradualmente il monitoraggio continuo e prepararlo alle dimissioni.
KJ ha trascorso i primi dieci mesi di vita in ospedale. Solo a giugno è tornato a casa per la prima volta. Da quel momento in poi, il suo sviluppo ha preso una direzione che in precedenza sembrava improbabile. Ha iniziato ad aumentare di peso, ad acquisire competenze appropriate all’età e a raggiungere gradualmente traguardi precoci dello sviluppo che in precedenza erano rimasti incerti.
I cambiamenti non si sono limitati alle condizioni mediche. Per la famiglia, questo ha significato un ritorno a una vita quotidiana che prima potevano solo sognare. Ad agosto, KJ ha festeggiato il suo primo compleanno fuori dall’ospedale, in netto contrasto con l’anno precedente, quando ogni giorno trascorreva sotto la supervisione di medici e attrezzature. Ora sta imparando a camminare, continuando ad acquisire nuove competenze e si avvicina il suo primo Natale a casa. Un anno fa, quella festa si è svolta in una stanza d’ospedale.
Una vita salvata e un futuro promettente per la medicina
I medici sottolineano che l’obiettivo della terapia andava ben oltre la sopravvivenza. Non si trattava solo di stabilizzare le condizioni del bambino, ma anche di dargli la possibilità di vivere un’infanzia senza la costante dipendenza da procedure e apparecchiature mediche.
Il lavoro su questo approccio non si è fermato a un solo caso. Il Programma di Terapia Genica per le Malattie Metaboliche Ereditarie presso il Children’s Hospital di Philadelphia è guidato da Rebecca Ahrens-Niklas. Continua a collaborare con Kiran Musunuru dell’Università della Pennsylvania. Insieme, stanno lavorando per adattare il metodo utilizzato nel caso di KJ ad altri bambini con diagnosi simili.
Il programma si concentra sui difetti congeniti del metabolismo, un gruppo di malattie in cui difetti genetici interrompono il funzionamento di vie chimiche vitali nell’organismo. Per molte di queste patologie non esiste un trattamento efficace e la cura è limitata alla gestione per tutta la vita. I ricercatori stanno studiando, in particolare, i disturbi del ciclo dell’urea, le acidemie organiche e i disturbi dell’ossidazione degli acidi grassi. Ognuna di queste condizioni ha le sue caratteristiche genetiche e biochimiche, quindi non esiste una soluzione unica per tutti.
L’esperienza di trattamento di KJ è servita da punto di partenza per i team di ricerca. La sua risposta alla terapia ha fornito dati importanti sul dosaggio, sulla sicurezza dell’intervento e sulla necessità di un monitoraggio a lungo termine. Queste informazioni sono già utilizzate per sviluppare futuri programmi di trattamento individualizzati.
Regolamentazione delle AI e dei trattamenti personalizzati
Il caso di KJ ha sollevato anche una questione più ampia: come regolamentare i trattamenti progettati per un singolo paziente. Tali interventi non rientrano nei tipici percorsi di approvazione dei farmaci, che si basano su studi clinici su larga scala. In questo caso, la terapia è stata sviluppata, testata e implementata in tempi brevi, sulla base di una situazione medica unica.
Per le famiglie affette da malattie metaboliche rare , la storia di KJ è diventata una cauta fonte di speranza. Dimostra che gli sforzi coordinati tra medici, scienziati e autorità di regolamentazione possono cambiare i risultati anche in casi in cui in precedenza non esistevano soluzioni.
L'articolo Un bambino, una mutazione, un algoritmo: così l’AI ha sconfitto una malattia mortale proviene da Red Hot Cyber.
Decapsulating a PIC12F683 to Examine Its CMOS Implementation
In a recent video, [Andrew Zonenberg] takes us through the process of decapsulating a PIC12F683 to take a peak at its CMOS implementation.
This is a multipart series with five parts done and more to come. The PIC12F683 is an 8-pin flash-based, 8-bit microcontroller from Microchip. [Andrew] picked the PIC12F683 for decapsulation because back in 2011 it was the first microcontroller he broke read-protection on and he wanted to go back and revisit this chip, given particularly that his resources and skills had advanced in the intervening period.
The five videos are a tour de force. He begins by taking a package cross section, then decapsulating and delayering. He collects high-resolution photos as he goes along. In the process, he takes some time to explain the dangers of working with acid and the risk mitigations he has in place. Then he does what he calls a “floorplan analysis” which takes stock of the entire chip before taking a close look at the SRAM implementation.
If you’re interested in decapsulating integrated circuits you might want to take a look at Laser Fault Injection, Now With Optional Decapping, A Particularly Festive Chip Decapping, or even read through the transcript of the Decapping Components Hack Chat With John McMaster.
youtube.com/embed/videoseries?…
Thanks to [Peter Monta] for the tip.
hackaday.com/2025/12/19/decaps…
Hackaday Podcast Episode 350: Damnation for Spreadsheets, Praise for Haiku, and Admiration for the Hacks In Between
This week’s Hackaday Podcast sees Elliot Williams joined by Jenny List for an all-European take on the week, and have we got some hacks for you!
In the news this week is NASA’s Maven Mars Orbiter, which may sadly have been lost. A sad day for study of the red planet, but at the same time a chance to look back at what has been a long and successful mission.
In the hacks of the week, we have a lo-fi camera, a very refined Commodore 64 laptop, and a MIDI slapophone to entertain you, as well as taking a detailed look at neutrino detectors. Then CYMK printing with laser cut stencils draws our attention, as well as the arrival of stable GPIB support for Linux. Finally both staffers let loose; Elliot with an epic rant about spreadsheets, and Jenny enthusiastically describing the Haiku operating system.
Check out the links below if you want to follow along, and as always, tell us what you think about this episode in the comments!
html5-player.libsyn.com/embed/…
It’s dangerous to go alone. Here, take this MP3.
Where to Follow Hackaday Podcast
Places to follow Hackaday podcasts:
iTunes
Spotify
Stitcher
RSS YouTube
Check out our Libsyn landing page
Episode 349 Show Notes:News:
NASA May Have Lost The MAVEN Mars Orbiter
What’s that Sound?
Congratulations to [kenbob] for guessing the spinning down washing machine. Everyone else tune in next year for your shot at the first sound of 2026.
Interesting Hacks of the Week:
Liberating AirPods With Bluetooth Spoofing
GitHub – tyalie/AAP-Protocol-Defintion: Decoding the Apple Accessory Protocol
Bypassing Airpods Hearing Aid Georestriction With A Faraday Cage
Nostalgic Camera Is A Mashup Of Analog Video Gear
Hidden Camera Build Proves You Can’t Trust Walnuts
Neutrino Transmutation Observed For The First Time
Detecting Anti-Neutrinos From Distant Fission Reactors Using Pure Water At SNO+
Engineering Lessons From The Super-Kamiokande Neutrino Observatory Failure
Detecting Neutrinos, The Slippery Ghost Particles That Don’t Want To Interact
Building A Commodore 64 Laptop
3D Printed Pi Laptop Honors The Iconic GRiD Compass
Taking Electronics To A Different Level
Taking It To Another Level: Making 3.3V Speak With 5V
Philips application note 97055, Bi-directional level shifter for I²C-bus and other systems.
Finally, A Pipe Slapophone With MIDI
Quick Hacks:
Elliot’s Picks:
WiFi Menorah For Eight Nights Of Bandwidth
Laser Cutter Plus CYMK Spraypaint Equals Full-Color Prints
Why Push A Button When A Machine Can Do It For You
Jenny’s Picks:
After Decades, Linux Finally Gains Stable GPIB Support
3D Printing And Metal Casting Are A Great Match
The Lethal Danger Of Combining Welding And Brake Cleaner
Can’t Miss Articles:
A Brief History Of The Spreadsheet
Jenny’s Daily Drivers: Haiku R1/beta5
hackaday.com/2025/12/19/hackad…
Vulnerabilità critica in FreeBSD: eseguibile codice arbitrario via IPv6
Una nuova vulnerabilità nei componenti FreeBSD responsabili della configurazione IPv6 consente l’esecuzione remota di codice arbitrario su un dispositivo situato sulla stessa rete locale dell’aggressore. Il problema riguarda tutte le versioni supportate del sistema operativo e richiede un’azione immediata per proteggere i dispositivi.
È stata scoperta una vulnerabilità nelle utility “rtsold” e “rtsol“, utilizzate per elaborare i messaggi pubblicitari del router come parte del meccanismo di configurazione automatica degli indirizzi IPv6. È stato scoperto che questi programmi non convalidano il parametro del suffisso di dominio passato in tali messaggi, inviandolo direttamente all’utility “resolvconf“, responsabile dell’aggiornamento della configurazione DNS.
Tuttavia, “resolvconf” è scritto come uno script shell e non filtra i dati in arrivo. L’assenza di escape implica che qualsiasi codice dannoso passato tramite il parametro domain list può essere eseguito sul sistema. Pertanto, un aggressore sulla stessa subnet può eseguire comandi sul dispositivo di destinazione senza richiedere privilegi di amministratore o interazioni precedenti.
Secondo gli sviluppatori di FreeBSD , il problema è limitato alle reti locali, poiché gli annunci del router non vengono instradati e non possono attraversare i confini dei segmenti di rete. Tuttavia, riguarda tutti i sistemi che utilizzano l’autoconfigurazione IPv6, in particolare le interfacce con il flag “ACCEPT_RTADV” abilitato, verificabile tramite “ifconfig“.
Per gli utenti che non utilizzano IPv6, non vi è alcun rischio. In caso contrario, si consiglia di aggiornare urgentemente il sistema all’ultima versione.
Gli aggiornamenti sono ora disponibili per tutte le branch di FreeBSD supportate, incluse le versioni 15.0, 14.3 e 13.5. L’aggiornamento è possibile sia tramite il meccanismo di patching binario integrato sia applicando modifiche al codice sorgente.
L’identificatore della vulnerabilità registrata è CVE-2025-14558. Le correzioni sono state pubblicate il 16 dicembre 2025 e sono incluse nei rami stabile e di rilascio di FreeBSD.
L'articolo Vulnerabilità critica in FreeBSD: eseguibile codice arbitrario via IPv6 proviene da Red Hot Cyber.
LLM e ransomware: la minaccia cambia marcia, ma senza cambiamenti radicali
@npub1vje7...y8ga
Gli LLM hanno l'effetto di accelerare il ciclo di vita del ransomware, ma senza trasformarlo in maniera radicale. Ecco i tre cambiamenti strutturali che si stanno verificando in parallelo
L'articolo LLM e ransomware: la minaccia cambia marcia, ma senza
Attach a Full Size Lens to a Tiny Camera
The Kodak Charmera is a tiny keychain camera produced by licencing out the name of the famous film manufacturer, and it’s the current must-have cool trinket among photo nerds. Inside is a tiny sensor and a fixed-focus M7 lens, and unlike many toy cameras it has better quality than its tiny package might lead you to expect. There will always be those who wish to push the envelope though, and [微攝 Macrodeon] is here to fit a lens mount for full-size lenses (Chinese language, subtitle translation available).
The hack involves cracking the camera open and separating the lens mount from the sensor. This is something we’re familiar with from other cameras, and it’s a fiddly process which requires a lot of care. A C-mount is then glued to the front, from which all manner of other lenses can be attached using a range of adapters. The focus requires a bit of effort to set up and we’re guessing that every lens becomes extreme telephoto due to the tiny sensor, but we’re sure hours of fun could be had.
The Charmera is almost constantly sold out, but you should be able to place a preorder for about $30 USD if you want one. If waiting months for delivery isn’t your bag, there are other cameras you can upgrade to C-mount.
youtube.com/embed/FMZ74QCaLdw?…
hackaday.com/2025/12/19/attach…