
Did you know, the bitcoin-dev mailing list has over 20,000 posts going back to June 2011?
If each post takes 30 min to read (on average), that’s over 400 days of nonstop reading!
To be fair,
1️⃣ Posts aren't easily searchable
2️⃣ If a thread spans multiple months back it can be broken
3️⃣ Your inbox probably has enough emails competing for your attention
Things can easily go ignored & unread. Few, if any, can say they have read it all.
For the rest of us, we started working into a way to download the mailing list straight to your brain. While we haven’t quite figured that out (yet), we've built the next best thing…
Meet 📚 Bitcoin TLDR v2 📚, a collection of summaries for the bitcoin-dev, lightning-dev, and Delving Bitcoin mailing lists.
➡️ tldr.bitcoinsearch.xyz
The mailing lists are known for being some of the best places to get updates on bitcoin development.
🔨 It’s where the builders go to propose new ideas, gather feedback, and hash it out.
Whether you are trying to stay on the cutting edge, or are catching up on bitcoin’s rich technical history, Bitcoin TLDR is made for you.
TLDR summarizes every individual mailing list post while also creating summaries at the thread level.
With daily updates, thread summaries remain fresh based on new replies so you never miss a beat. 👀
Visit the Active Discussions section to see what’s trending: 
 If you’re already subscribed to the mailing lists but feel overwhelmed, try out the Bitcoin TLDR newsletter. It’s got weekly summaries of all the latest activity, providing a manageable way for you to stay on top of it all.
 How Does It Work?
- The Scraper Repo
This scrapes through Delving Bitcoin and the Bitcoin Dev Mailing List, fetches mailing list pages, and stores them locally.
A parser processes those files to extract clean metadata and message content.
Finally, an indexer pushes the structured documents into an index in Elasticsearch for search and analysis.
- The Summarizer
The summarizer repo has two main parts. First, it makes sure Elasticsearch always has the latest full thread data by syncing the combined XML files. Second, it adds short AI summaries to posts that don’t have one yet. This way, Elasticsearch stores both the complete thread summaries, and individual post.
Third, it creates AI summaries for the full thread, creating a combined summary.
- The TLDR Frontend
This renders summaries for each thread and post, and displays them with a beautiful UI.
- - - - - - - - - - - - - - - - - - - - - - - - - - - -
Bitcoin TLDR is completely free and open-source. It’s designed to help more people engage with high signal bitcoin and lightning tech discussions. Give it a try and let us know what you think!
➡️ tldr.bitcoinsearch.xyz
How Does It Work?
- The Scraper Repo
This scrapes through Delving Bitcoin and the Bitcoin Dev Mailing List, fetches mailing list pages, and stores them locally.
A parser processes those files to extract clean metadata and message content.
Finally, an indexer pushes the structured documents into an index in Elasticsearch for search and analysis.
- The Summarizer
The summarizer repo has two main parts. First, it makes sure Elasticsearch always has the latest full thread data by syncing the combined XML files. Second, it adds short AI summaries to posts that don’t have one yet. This way, Elasticsearch stores both the complete thread summaries, and individual post.
Third, it creates AI summaries for the full thread, creating a combined summary.
- The TLDR Frontend
This renders summaries for each thread and post, and displays them with a beautiful UI.
- - - - - - - - - - - - - - - - - - - - - - - - - - - -
Bitcoin TLDR is completely free and open-source. It’s designed to help more people engage with high signal bitcoin and lightning tech discussions. Give it a try and let us know what you think!
➡️ tldr.bitcoinsearch.xyz
Bitcoin TLDR
Bitcoin tech mailing list summaries at your fingertips
If you’re already subscribed to the mailing lists but feel overwhelmed, try out the Bitcoin TLDR newsletter. It’s got weekly summaries of all the latest activity, providing a manageable way for you to stay on top of it all.
Bitcoin TLDR
Bitcoin tech mailing list summaries at your fingertips
How Does It Work?
- The Scraper Repo
This scrapes through Delving Bitcoin and the Bitcoin Dev Mailing List, fetches mailing list pages, and stores them locally.
A parser processes those files to extract clean metadata and message content.
Finally, an indexer pushes the structured documents into an index in Elasticsearch for search and analysis.
- The Summarizer
The summarizer repo has two main parts. First, it makes sure Elasticsearch always has the latest full thread data by syncing the combined XML files. Second, it adds short AI summaries to posts that don’t have one yet. This way, Elasticsearch stores both the complete thread summaries, and individual post.
Third, it creates AI summaries for the full thread, creating a combined summary.
- The TLDR Frontend
This renders summaries for each thread and post, and displays them with a beautiful UI.
- - - - - - - - - - - - - - - - - - - - - - - - - - - -
Bitcoin TLDR is completely free and open-source. It’s designed to help more people engage with high signal bitcoin and lightning tech discussions. Give it a try and let us know what you think!
➡️ tldr.bitcoinsearch.xyz
 🔍 Bitcoin Transcripts is a filterable library of transcripts from:
• dev meetups
• conferences
• podcasts
• panels
Skim talks, quote insights, and search by keyword.
All in one place.
👉
🔍 Bitcoin Transcripts is a filterable library of transcripts from:
• dev meetups
• conferences
• podcasts
• panels
Skim talks, quote insights, and search by keyword.
All in one place.
👉  Many thanks to our contributors:
- Dev:
Many thanks to our contributors:
- Dev: 


 We'll also have we’ll have additional prizes for Warnet track winners that are able to join in person. These gorgeous coasters by A+ Engrave are just one example! 🤩


 This track is for hackers with some level of coding skill, & the ability to use the command line interface (CLI). Familiarity with Bitcoin Core, esp. the JSON-RPC interface is useful. A general understanding of how blockchains and distributed networks work will come in handy.
Who's ready to win? Sign up below! 👇
This track is for hackers with some level of coding skill, & the ability to use the command line interface (CLI). Familiarity with Bitcoin Core, esp. the JSON-RPC interface is useful. A general understanding of how blockchains and distributed networks work will come in handy.
Who's ready to win? Sign up below! 👇


 𝑁𝑜𝑡𝑒: 𝑡ℎ𝑖𝑠 𝑒𝑥𝑎𝑚𝑝𝑙𝑒 𝑖𝑠 𝑓𝑜𝑟 𝑎 𝑠𝑒𝑔𝑤𝑖𝑡 𝑣0 𝑡𝑟𝑎𝑛𝑠𝑎𝑐𝑡𝑖𝑜𝑛 𝑠𝑜 𝑠𝑜𝑚𝑒 𝑜𝑓 𝑡ℎ𝑒 𝑠𝑝𝑒𝑐𝑖𝑓𝑖𝑐𝑠 𝑎𝑟𝑒 𝑑𝑖𝑓𝑓𝑒𝑟𝑒𝑛𝑡 𝑓𝑜𝑟 𝑙𝑒𝑔𝑎𝑐𝑦 𝑎𝑛𝑑 𝑡𝑎𝑝𝑟𝑜𝑜𝑡 (𝑠𝑒𝑔𝑤𝑖𝑡 𝑣1) 𝑡𝑟𝑎𝑛𝑠𝑎𝑐𝑡𝑖𝑜𝑛𝑠. 𝐻𝑜𝑤𝑒𝑣𝑒𝑟, 𝑡ℎ𝑒 𝑔𝑒𝑛𝑒𝑟𝑎𝑙 𝑐𝑜𝑛𝑐𝑒𝑝𝑡𝑠 𝑎𝑟𝑒 𝑠𝑡𝑖𝑙𝑙 𝑡ℎ𝑒 𝑠𝑎𝑚𝑒!
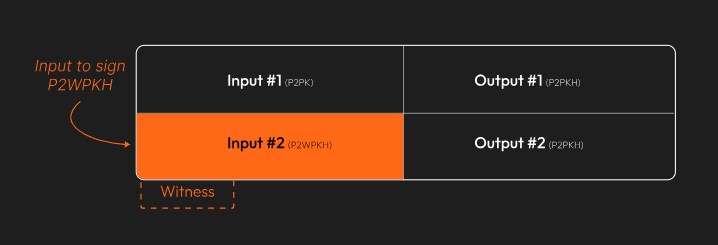
The transaction we'll be working with has two inputs. The first is a legacy P2PK input–we won’t be covering that today.
Instead, we’re going to focus on the second input, the P2WPKH (native segwit) one.
𝑁𝑜𝑡𝑒: 𝑡ℎ𝑖𝑠 𝑒𝑥𝑎𝑚𝑝𝑙𝑒 𝑖𝑠 𝑓𝑜𝑟 𝑎 𝑠𝑒𝑔𝑤𝑖𝑡 𝑣0 𝑡𝑟𝑎𝑛𝑠𝑎𝑐𝑡𝑖𝑜𝑛 𝑠𝑜 𝑠𝑜𝑚𝑒 𝑜𝑓 𝑡ℎ𝑒 𝑠𝑝𝑒𝑐𝑖𝑓𝑖𝑐𝑠 𝑎𝑟𝑒 𝑑𝑖𝑓𝑓𝑒𝑟𝑒𝑛𝑡 𝑓𝑜𝑟 𝑙𝑒𝑔𝑎𝑐𝑦 𝑎𝑛𝑑 𝑡𝑎𝑝𝑟𝑜𝑜𝑡 (𝑠𝑒𝑔𝑤𝑖𝑡 𝑣1) 𝑡𝑟𝑎𝑛𝑠𝑎𝑐𝑡𝑖𝑜𝑛𝑠. 𝐻𝑜𝑤𝑒𝑣𝑒𝑟, 𝑡ℎ𝑒 𝑔𝑒𝑛𝑒𝑟𝑎𝑙 𝑐𝑜𝑛𝑐𝑒𝑝𝑡𝑠 𝑎𝑟𝑒 𝑠𝑡𝑖𝑙𝑙 𝑡ℎ𝑒 𝑠𝑎𝑚𝑒!
The transaction we'll be working with has two inputs. The first is a legacy P2PK input–we won’t be covering that today.
Instead, we’re going to focus on the second input, the P2WPKH (native segwit) one.
 Since this example came from one of the BIP-143 test vectors, we know what the final, signed transaction looks like. The goal is to recreate this:
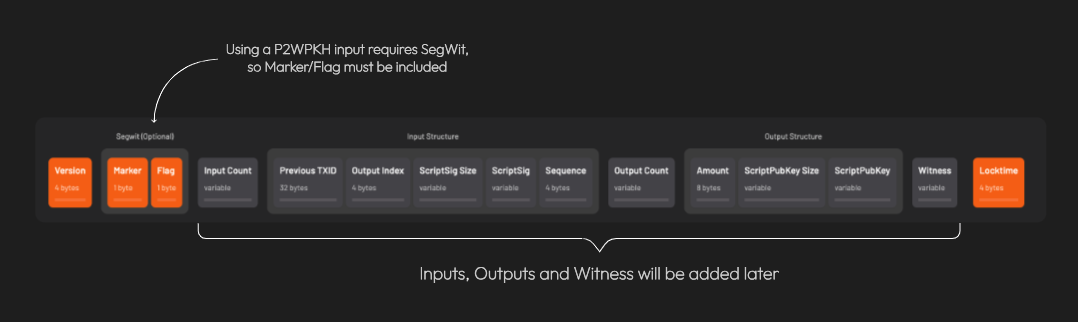
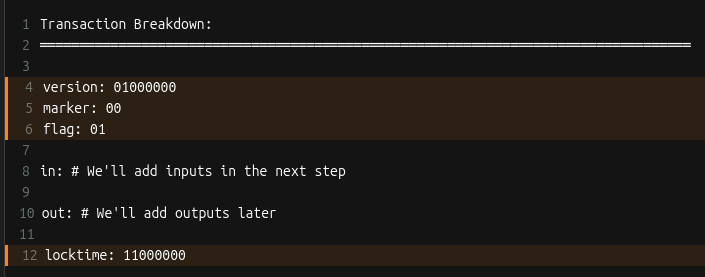
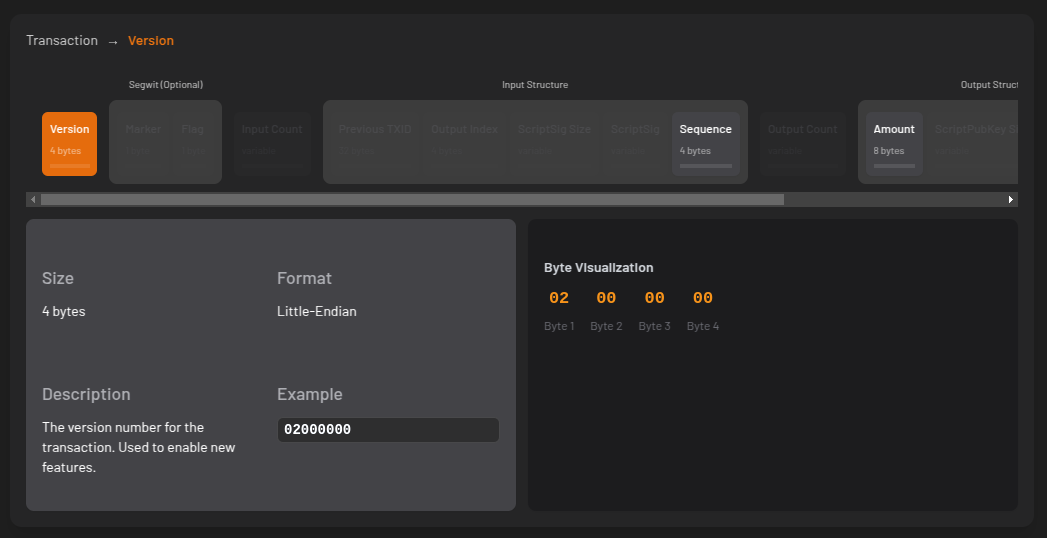
 First, we create the base transaction, the transaction without any signatures.
We’ll start with the
- version number
- marker & flag fields (to indicate the tx is segwit)
- locktime
First, we create the base transaction, the transaction without any signatures.
We’ll start with the
- version number
- marker & flag fields (to indicate the tx is segwit)
- locktime
 𝐴 𝑛𝑜𝑡𝑒 𝑜𝑛 𝑠𝑒𝑔𝑤𝑖𝑡 𝑣𝑠. 𝑙𝑒𝑔𝑎𝑐𝑦 𝑡𝑟𝑎𝑛𝑠𝑎𝑐𝑡𝑖𝑜𝑛𝑠: 𝐵𝑒𝑐𝑎𝑢𝑠𝑒 𝑎𝑡 𝑙𝑒𝑎𝑠𝑡 𝑜𝑛𝑒 𝑜𝑓 𝑡ℎ𝑒 𝑖𝑛𝑝𝑢𝑡𝑠 𝑖𝑠 𝑠𝑒𝑔𝑤𝑖𝑡 (𝑛𝑎𝑡𝑖𝑣𝑒 𝑜𝑟 𝑤𝑟𝑎𝑝𝑝𝑒𝑑), 𝑡ℎ𝑒 𝑡𝑟𝑎𝑛𝑠𝑎𝑐𝑡𝑖𝑜𝑛 𝑖𝑠 𝑎𝑙𝑠𝑜 𝑐𝑜𝑛𝑠𝑖𝑑𝑒𝑟𝑒𝑑 𝑠𝑒𝑔𝑤𝑖𝑡.
 Here’s what we have so far:
 Let’s add inputs! Recall that all inputs come from existing transactions. That means for each input, we need to find the transaction it came from and get:
1. that transaction’s ID
2. the output index
𝐖𝐡𝐚𝐭’𝐬 𝐚𝐧 𝐨𝐮𝐭𝐩𝐮𝐭 𝐢𝐧𝐝𝐞𝐱?
Every transaction has a list of outputs. The “output index” is a way to reference a specific output from the list.
We need to ask, "from a transaction’s list of outputs, which one corresponds to the input I care about?”
For each input, two more things are needed: the 𝐬𝐜𝐫𝐢𝐩𝐭𝐒𝐢𝐠 (placeholder for data required to spend the input), and a 𝐬𝐞𝐪𝐮𝐞𝐧𝐜𝐞 𝐧𝐮𝐦𝐛𝐞𝐫 (usually 0xFFFFFFFF)
Let’s add inputs! Recall that all inputs come from existing transactions. That means for each input, we need to find the transaction it came from and get:
1. that transaction’s ID
2. the output index
𝐖𝐡𝐚𝐭’𝐬 𝐚𝐧 𝐨𝐮𝐭𝐩𝐮𝐭 𝐢𝐧𝐝𝐞𝐱?
Every transaction has a list of outputs. The “output index” is a way to reference a specific output from the list.
We need to ask, "from a transaction’s list of outputs, which one corresponds to the input I care about?”
For each input, two more things are needed: the 𝐬𝐜𝐫𝐢𝐩𝐭𝐒𝐢𝐠 (placeholder for data required to spend the input), and a 𝐬𝐞𝐪𝐮𝐞𝐧𝐜𝐞 𝐧𝐮𝐦𝐛𝐞𝐫 (usually 0xFFFFFFFF)
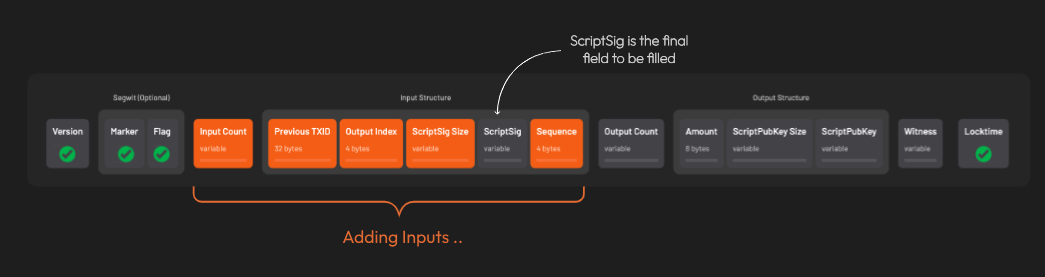 After adding all the inputs, the transaction looks like this:
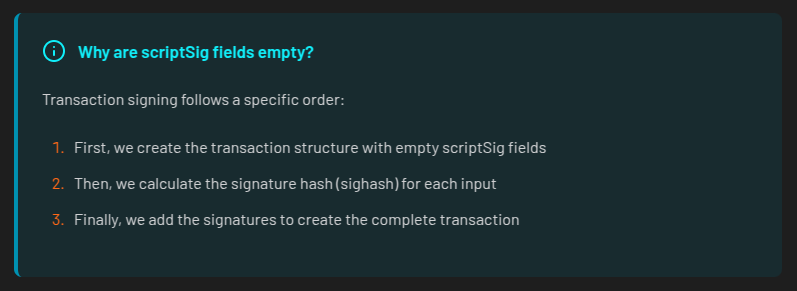
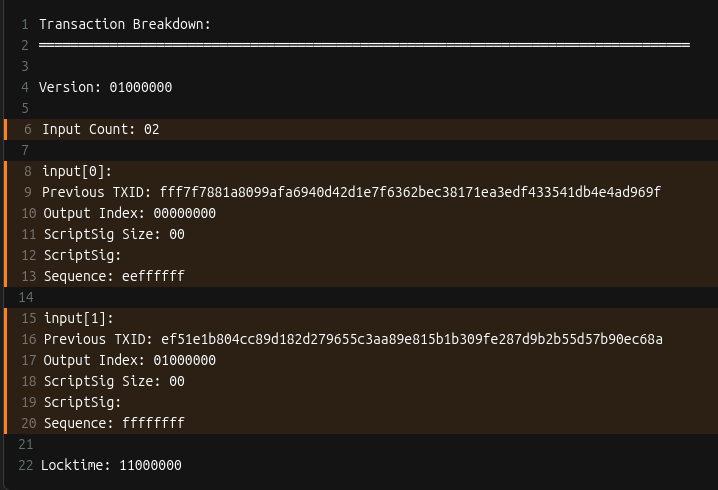 Remember when we said the scriptSig would be a placeholder? Here’s why those fields are currently empty:
 Time to add outputs! For each output, we include the
- amount (in satoshis)
- scriptPubKey: the locking script that defines the rules for how the output can be spent
Time to add outputs! For each output, we include the
- amount (in satoshis)
- scriptPubKey: the locking script that defines the rules for how the output can be spent
 Things are starting to come together!
 A few more things are needed before we can get to signing. First is setting up the 𝐰𝐢𝐭𝐧𝐞𝐬𝐬 field.
This is where the signature and corresponding public key go for segwit transactions.
The witness field starts off empty. This is different from legacy transactions where signatures are placed directly in the scriptSig field.
A few more things are needed before we can get to signing. First is setting up the 𝐰𝐢𝐭𝐧𝐞𝐬𝐬 field.
This is where the signature and corresponding public key go for segwit transactions.
The witness field starts off empty. This is different from legacy transactions where signatures are placed directly in the scriptSig field.
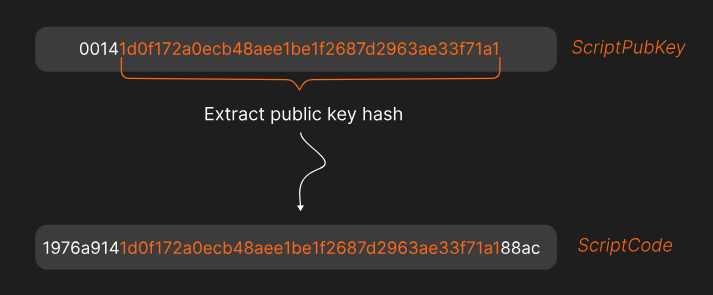
 The next thing that’s needed is the 𝐬𝐜𝐫𝐢𝐩𝐭𝐂𝐨𝐝𝐞.
The scriptCode for a P2WPKH (pay-to-witness-public-key-hash) input is:
The next thing that’s needed is the 𝐬𝐜𝐫𝐢𝐩𝐭𝐂𝐨𝐝𝐞.
The scriptCode for a P2WPKH (pay-to-witness-public-key-hash) input is:
 𝑊ℎ𝑎𝑡’𝑠 𝑡ℎ𝑎𝑡 20 𝑏𝑦𝑡𝑒 𝑝𝑢𝑏𝑘𝑒𝑦 ℎ𝑎𝑠ℎ?
𝐸𝑎𝑟𝑙𝑖𝑒𝑟 𝑤𝑒 𝑠𝑎𝑤 𝑒𝑎𝑐ℎ 𝑜𝑢𝑡𝑝𝑢𝑡 ℎ𝑎𝑠 𝑎 𝑠𝑐𝑟𝑖𝑝𝑡𝑃𝑢𝑏𝐾𝑒𝑦 (𝑟𝑢𝑙𝑒𝑠 𝑓𝑜𝑟 ℎ𝑜𝑤 𝑡𝑜 𝑠𝑝𝑒𝑛𝑑 𝑡ℎ𝑒 𝑜𝑢𝑡𝑝𝑢𝑡). 𝐴𝑙𝑠𝑜, 𝑟𝑒𝑐𝑎𝑙𝑙 𝑡ℎ𝑎𝑡 𝑡ℎ𝑒 𝑖𝑛𝑝𝑢𝑡 𝑡𝑜 𝑜𝑛𝑒 𝑡𝑟𝑎𝑛𝑠𝑎𝑐𝑡𝑖𝑜𝑛 𝑖𝑠 𝑡ℎ𝑒 𝑜𝑢𝑡𝑝𝑢𝑡 𝑓𝑟𝑜𝑚 𝑎𝑛𝑜𝑡ℎ𝑒𝑟.
𝑇ℎ𝑒 20 𝑏𝑦𝑡𝑒 𝑝𝑢𝑏𝑘𝑒𝑦 ℎ𝑎𝑠ℎ 𝑖𝑠 𝑒𝑥𝑡𝑟𝑎𝑐𝑡𝑒𝑑 𝑓𝑟𝑜𝑚 𝑡ℎ𝑒 𝑐𝑜𝑟𝑟𝑒𝑠𝑝𝑜𝑛𝑑𝑖𝑛𝑔 𝑜𝑢𝑡𝑝𝑢𝑡'𝑠 𝑠𝑐𝑟𝑖𝑝𝑡𝑃𝑢𝑏𝐾𝑒𝑦.
Here’s the 𝐬𝐜𝐫𝐢𝐩𝐭𝐂𝐨𝐝𝐞 for the example we’re working on:
𝑊ℎ𝑎𝑡’𝑠 𝑡ℎ𝑎𝑡 20 𝑏𝑦𝑡𝑒 𝑝𝑢𝑏𝑘𝑒𝑦 ℎ𝑎𝑠ℎ?
𝐸𝑎𝑟𝑙𝑖𝑒𝑟 𝑤𝑒 𝑠𝑎𝑤 𝑒𝑎𝑐ℎ 𝑜𝑢𝑡𝑝𝑢𝑡 ℎ𝑎𝑠 𝑎 𝑠𝑐𝑟𝑖𝑝𝑡𝑃𝑢𝑏𝐾𝑒𝑦 (𝑟𝑢𝑙𝑒𝑠 𝑓𝑜𝑟 ℎ𝑜𝑤 𝑡𝑜 𝑠𝑝𝑒𝑛𝑑 𝑡ℎ𝑒 𝑜𝑢𝑡𝑝𝑢𝑡). 𝐴𝑙𝑠𝑜, 𝑟𝑒𝑐𝑎𝑙𝑙 𝑡ℎ𝑎𝑡 𝑡ℎ𝑒 𝑖𝑛𝑝𝑢𝑡 𝑡𝑜 𝑜𝑛𝑒 𝑡𝑟𝑎𝑛𝑠𝑎𝑐𝑡𝑖𝑜𝑛 𝑖𝑠 𝑡ℎ𝑒 𝑜𝑢𝑡𝑝𝑢𝑡 𝑓𝑟𝑜𝑚 𝑎𝑛𝑜𝑡ℎ𝑒𝑟.
𝑇ℎ𝑒 20 𝑏𝑦𝑡𝑒 𝑝𝑢𝑏𝑘𝑒𝑦 ℎ𝑎𝑠ℎ 𝑖𝑠 𝑒𝑥𝑡𝑟𝑎𝑐𝑡𝑒𝑑 𝑓𝑟𝑜𝑚 𝑡ℎ𝑒 𝑐𝑜𝑟𝑟𝑒𝑠𝑝𝑜𝑛𝑑𝑖𝑛𝑔 𝑜𝑢𝑡𝑝𝑢𝑡'𝑠 𝑠𝑐𝑟𝑖𝑝𝑡𝑃𝑢𝑏𝐾𝑒𝑦.
Here’s the 𝐬𝐜𝐫𝐢𝐩𝐭𝐂𝐨𝐝𝐞 for the example we’re working on:
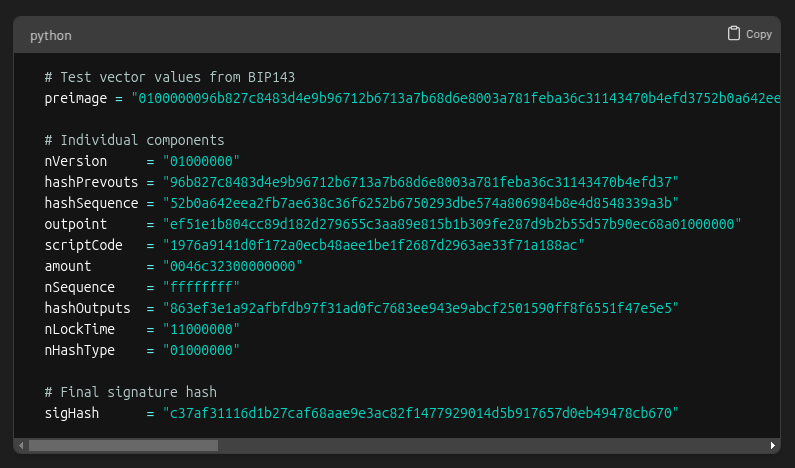
 Lastly, three important hashes are required.
The first is 𝐡𝐚𝐬𝐡𝐏𝐫𝐞𝐯𝐨𝐮𝐭𝐬. It’s the double SHA256 hash of all input outpoints (outpoint = the transaction id + output index)
The second is 𝐡𝐚𝐬𝐡𝐒𝐞𝐪𝐮𝐞𝐧𝐜𝐞, the double SHA256 hash of all input sequence numbers.
The third is 𝐡𝐚𝐬𝐡𝐎𝐮𝐭𝐩𝐮𝐭𝐬, the double SHA256 hash of all outputs.
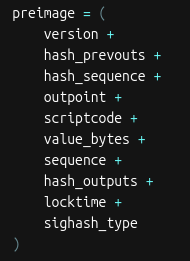
That’s everything (finally!). Let’s put it all together into something that can be signed!
When signing a transaction, the spender actually signs a hash of the transaction data, not the entire transaction itself. This hash is called the 𝐬𝐢𝐠𝐡𝐚𝐬𝐡.
The data used to create the sighash is called the 𝐩𝐫𝐞𝐢𝐦𝐚𝐠𝐞.
For a transaction input, the preimage is made of these items:
Lastly, three important hashes are required.
The first is 𝐡𝐚𝐬𝐡𝐏𝐫𝐞𝐯𝐨𝐮𝐭𝐬. It’s the double SHA256 hash of all input outpoints (outpoint = the transaction id + output index)
The second is 𝐡𝐚𝐬𝐡𝐒𝐞𝐪𝐮𝐞𝐧𝐜𝐞, the double SHA256 hash of all input sequence numbers.
The third is 𝐡𝐚𝐬𝐡𝐎𝐮𝐭𝐩𝐮𝐭𝐬, the double SHA256 hash of all outputs.
That’s everything (finally!). Let’s put it all together into something that can be signed!
When signing a transaction, the spender actually signs a hash of the transaction data, not the entire transaction itself. This hash is called the 𝐬𝐢𝐠𝐡𝐚𝐬𝐡.
The data used to create the sighash is called the 𝐩𝐫𝐞𝐢𝐦𝐚𝐠𝐞.
For a transaction input, the preimage is made of these items:
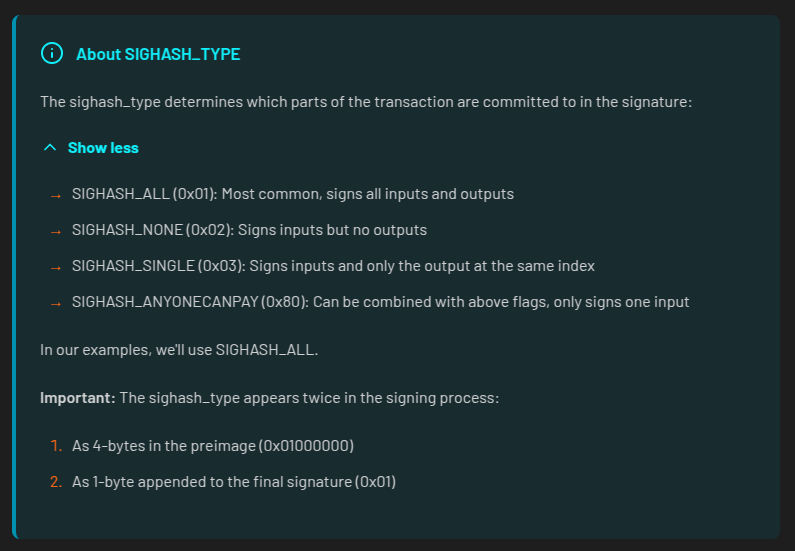
 The sighash_type indicates which parts of the transaction the signature is committing to.
 After hashing the preimage twice with SHA-256, we’re left with the sighash.
At last! It’s time to do some signing!
After hashing the preimage twice with SHA-256, we’re left with the sighash.
At last! It’s time to do some signing!
 There are a few steps for signing a segwit (v0) transaction.
First, the signer’s private key is used to create an ECDSA signature for the sighash.
The resulting signature has two parts, 𝑟 and 𝑠.
In ECDSA, there are actually two valid s values for every signature: a "high" value and a "low" value.
Both are mathematically valid, but bitcoin requires using the low s value to prevent transaction malleability (that means altering a transaction's ID!)
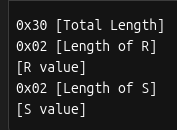
After selecting the low s value, the signature must be encoded into DER format. This is how it’s structured:
There are a few steps for signing a segwit (v0) transaction.
First, the signer’s private key is used to create an ECDSA signature for the sighash.
The resulting signature has two parts, 𝑟 and 𝑠.
In ECDSA, there are actually two valid s values for every signature: a "high" value and a "low" value.
Both are mathematically valid, but bitcoin requires using the low s value to prevent transaction malleability (that means altering a transaction's ID!)
After selecting the low s value, the signature must be encoded into DER format. This is how it’s structured:
 And here’s what the DER encoded signature looks like for our example:
 The last step is to add a byte at the end for the sighash type. If we look back at the preimage made earlier we see this example is using SIGHASH_ALL (0x01).
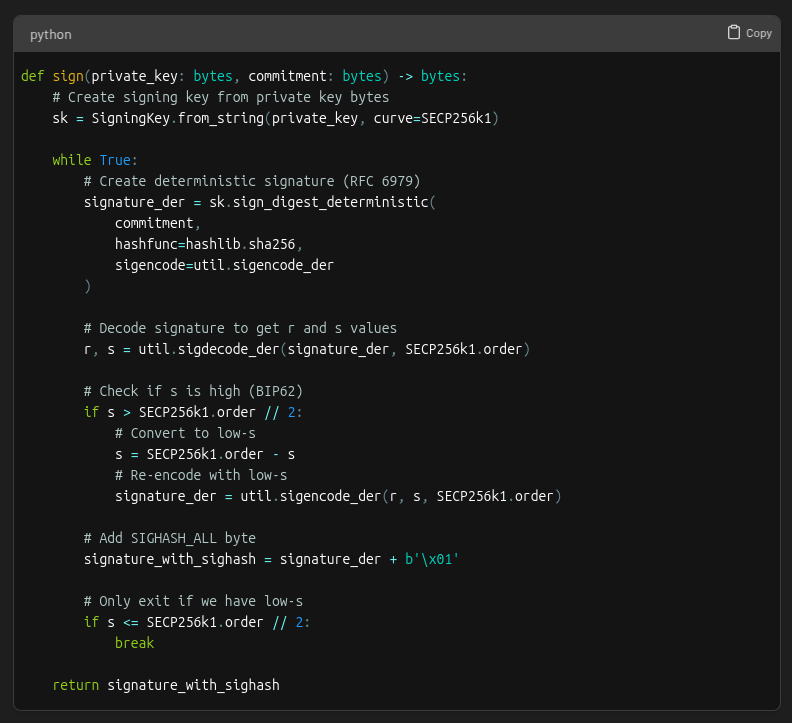
The full code for the signing step looks like this:
The last step is to add a byte at the end for the sighash type. If we look back at the preimage made earlier we see this example is using SIGHASH_ALL (0x01).
The full code for the signing step looks like this:
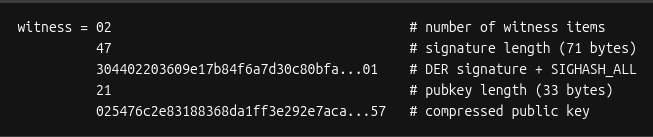
 Remember the transaction witness field we set space aside for? It’s now time to put the signature in it 🚀
 This is how the witness field is structured:
 Which works out to be this for our example:
 With the completion of the witness field, the transaction is now signed!
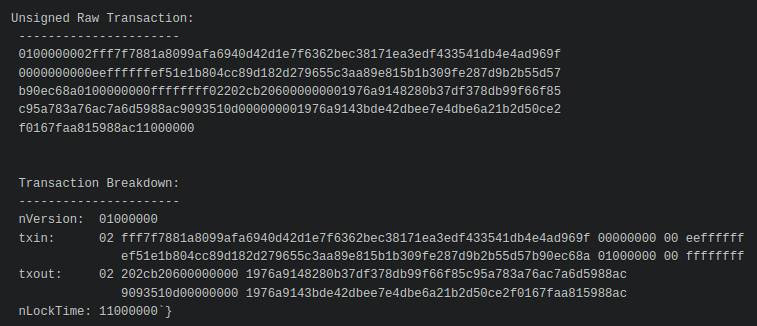
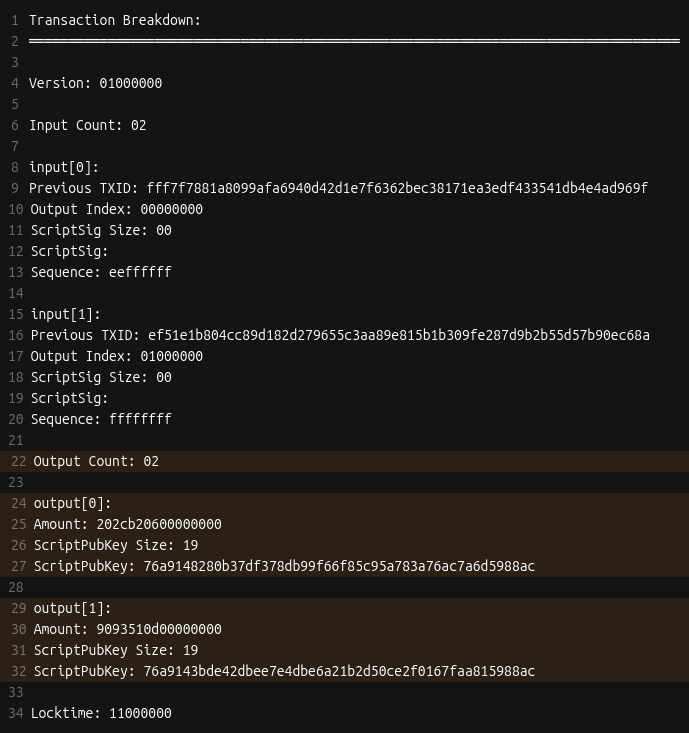
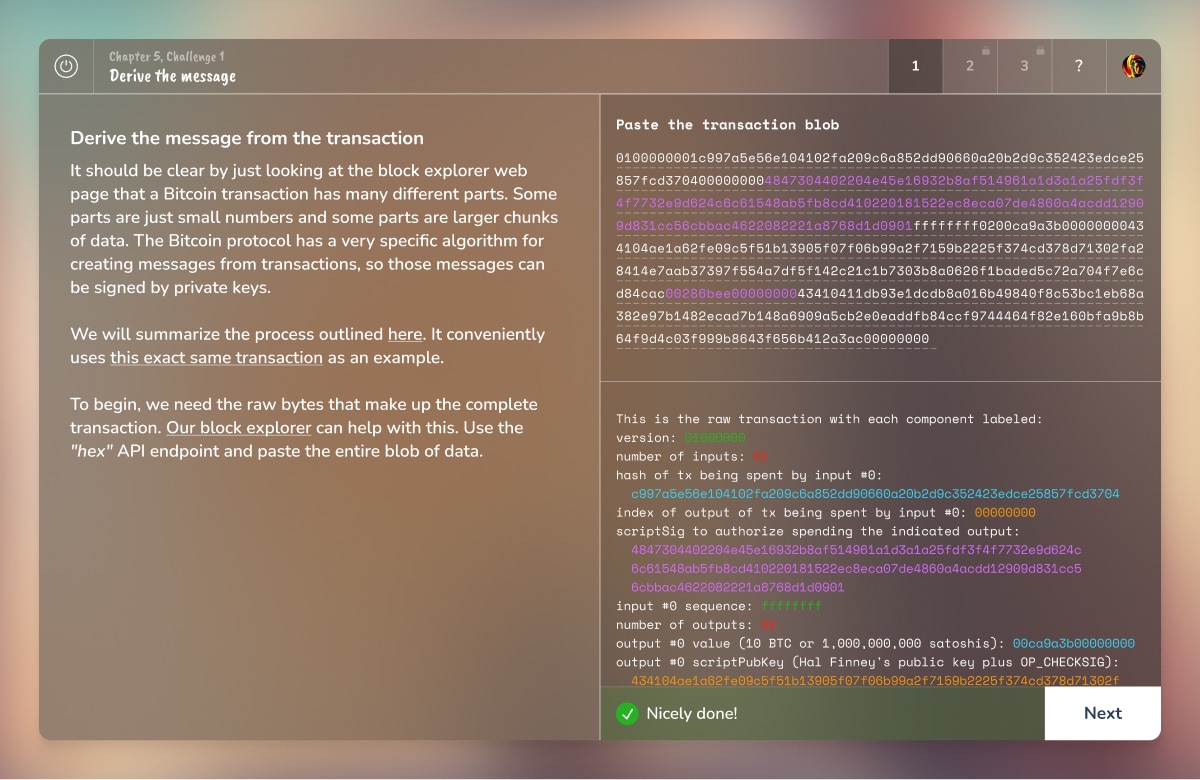
 This is what the final signed transaction hex looks like broken down:
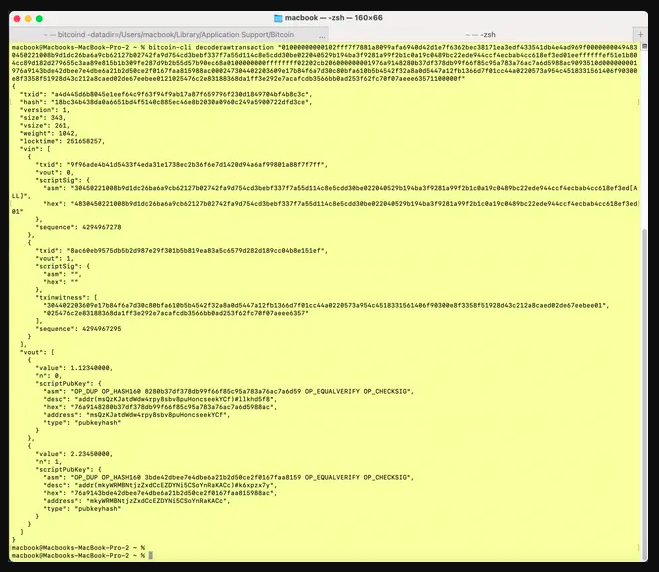
 Bonus: You can use the Bitcoin Core CLI decoderawtransaction command to examine all the parts of the raw transaction hex
 * ~ * ~ * ~ * ~ * ~ * ~
If you made it to the end, give yourself a pat on the back. If you enjoyed it, be sure to like this post so we know to make more like it!
* ~ * ~ * ~ * ~ * ~ * ~
This material is from Decoding Bitcoin, your go-to resource for understanding bitcoin, #privacy, and #decentralization.
You can visit
* ~ * ~ * ~ * ~ * ~ * ~
If you made it to the end, give yourself a pat on the back. If you enjoyed it, be sure to like this post so we know to make more like it!
* ~ * ~ * ~ * ~ * ~ * ~
This material is from Decoding Bitcoin, your go-to resource for understanding bitcoin, #privacy, and #decentralization.
You can visit 

 Hope you learned something new about transaction signing. If you enjoyed this, share it with a friend and don’t forget to follow us,
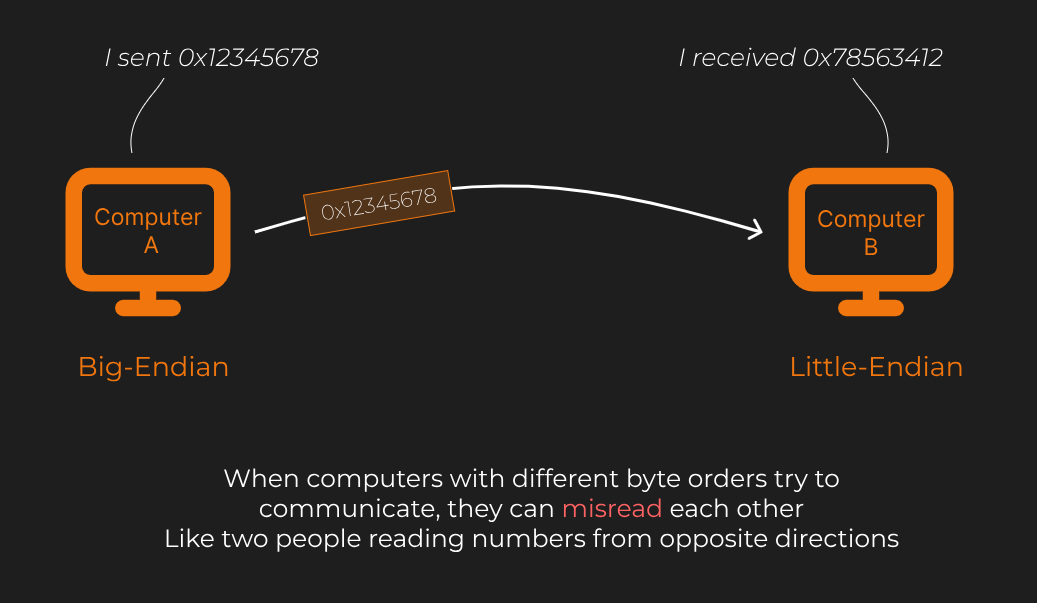
  Similarly, computers have two ways to store data:
1. 𝐁𝐢𝐠-𝐞𝐧𝐝𝐢𝐚𝐧 (BE): Most significant byte first
2. 𝐋𝐢𝐭𝐭𝐥𝐞-𝐞𝐧𝐝𝐢𝐚𝐧 (LE): Least significant byte first
Similarly, computers have two ways to store data:
1. 𝐁𝐢𝐠-𝐞𝐧𝐝𝐢𝐚𝐧 (BE): Most significant byte first
2. 𝐋𝐢𝐭𝐭𝐥𝐞-𝐞𝐧𝐝𝐢𝐚𝐧 (LE): Least significant byte first
 When computers with different byte orders try to communicate, they can misread each other. It’s like two people reading numbers from opposite directions.
 𝐁𝐢𝐠-𝐞𝐧𝐝𝐢𝐚𝐧 𝐬𝐭𝐨𝐫𝐞𝐬 𝐭𝐡𝐞 𝐦𝐨𝐬𝐭 𝐬𝐢𝐠𝐧𝐢𝐟𝐢𝐜𝐚𝐧𝐭 𝐛𝐲𝐭𝐞 𝐟𝐢𝐫𝐬𝐭. This is similar to how humans read numbers and Hex in most cases: starting with the most important information.
Suppose we want to store the number 12345678 (hexadecimal: 0x00BC614E) in memory. In big-endian, the bytes are stored in this order:
00 BC 61 4E
𝐁𝐢𝐠-𝐞𝐧𝐝𝐢𝐚𝐧 𝐬𝐭𝐨𝐫𝐞𝐬 𝐭𝐡𝐞 𝐦𝐨𝐬𝐭 𝐬𝐢𝐠𝐧𝐢𝐟𝐢𝐜𝐚𝐧𝐭 𝐛𝐲𝐭𝐞 𝐟𝐢𝐫𝐬𝐭. This is similar to how humans read numbers and Hex in most cases: starting with the most important information.
Suppose we want to store the number 12345678 (hexadecimal: 0x00BC614E) in memory. In big-endian, the bytes are stored in this order:
00 BC 61 4E
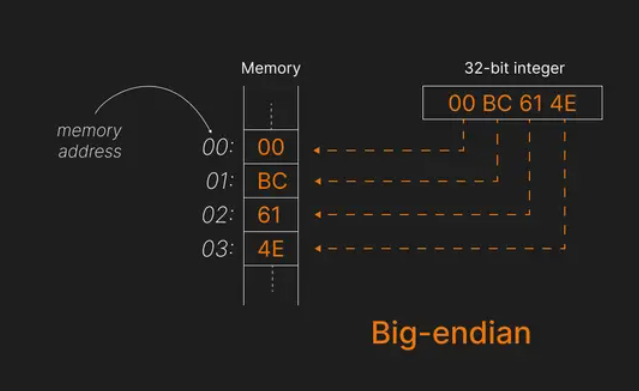 Observe that:
- The 𝐦𝐨𝐬𝐭 𝐬𝐢𝐠𝐧𝐢𝐟𝐢𝐜𝐚𝐧𝐭 𝐛𝐲𝐭𝐞 (00) is stored at the 𝐥𝐨𝐰𝐞𝐬𝐭 𝐦𝐞𝐦𝐨𝐫𝐲 𝐚𝐝𝐝𝐫𝐞𝐬𝐬 (00).
- The 𝐥𝐞𝐚𝐬𝐭 𝐬𝐢𝐠𝐧𝐢𝐟𝐢𝐜𝐚𝐧𝐭 𝐛𝐲𝐭𝐞 (4E) is stored at the 𝐡𝐢𝐠𝐡𝐞𝐬𝐭 𝐚𝐝𝐝𝐫𝐞𝐬𝐬 (03).
Big-endian is considered more "human-readable" because the data is stored in the order we naturally read it.
𝐋𝐢𝐭𝐭𝐥𝐞-𝐞𝐧𝐝𝐢𝐚𝐧 𝐬𝐭𝐨𝐫𝐞𝐬 𝐭𝐡𝐞 𝐥𝐞𝐚𝐬𝐭 𝐬𝐢𝐠𝐧𝐢𝐟𝐢𝐜𝐚𝐧𝐭 𝐛𝐲𝐭𝐞 𝐟𝐢𝐫𝐬𝐭. This might feel counter intuitive to humans but is more efficient for modern processors.
Using the same number 12345678 (0x00BC614E), here's how it looks in little-endian:
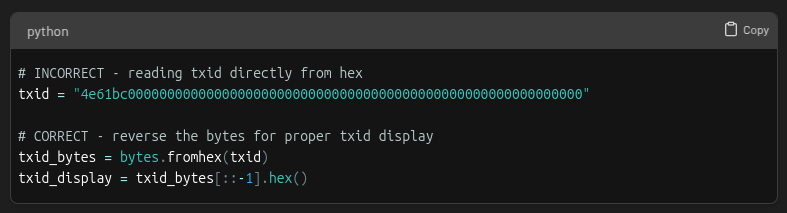
4E 61 BC 00
Observe that:
- The 𝐦𝐨𝐬𝐭 𝐬𝐢𝐠𝐧𝐢𝐟𝐢𝐜𝐚𝐧𝐭 𝐛𝐲𝐭𝐞 (00) is stored at the 𝐥𝐨𝐰𝐞𝐬𝐭 𝐦𝐞𝐦𝐨𝐫𝐲 𝐚𝐝𝐝𝐫𝐞𝐬𝐬 (00).
- The 𝐥𝐞𝐚𝐬𝐭 𝐬𝐢𝐠𝐧𝐢𝐟𝐢𝐜𝐚𝐧𝐭 𝐛𝐲𝐭𝐞 (4E) is stored at the 𝐡𝐢𝐠𝐡𝐞𝐬𝐭 𝐚𝐝𝐝𝐫𝐞𝐬𝐬 (03).
Big-endian is considered more "human-readable" because the data is stored in the order we naturally read it.
𝐋𝐢𝐭𝐭𝐥𝐞-𝐞𝐧𝐝𝐢𝐚𝐧 𝐬𝐭𝐨𝐫𝐞𝐬 𝐭𝐡𝐞 𝐥𝐞𝐚𝐬𝐭 𝐬𝐢𝐠𝐧𝐢𝐟𝐢𝐜𝐚𝐧𝐭 𝐛𝐲𝐭𝐞 𝐟𝐢𝐫𝐬𝐭. This might feel counter intuitive to humans but is more efficient for modern processors.
Using the same number 12345678 (0x00BC614E), here's how it looks in little-endian:
4E 61 BC 00
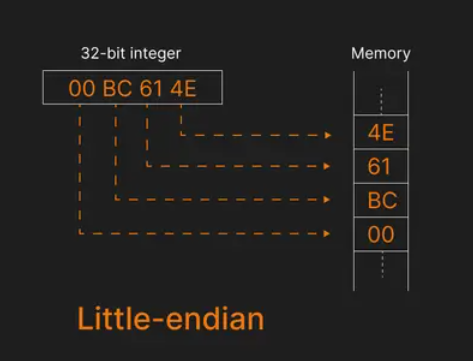 This time, the 𝐥𝐞𝐚𝐬𝐭 𝐬𝐢𝐠𝐧𝐢𝐟𝐢𝐜𝐚𝐧𝐭 𝐛𝐲𝐭𝐞 (4E) is stored at the 𝐥𝐨𝐰𝐞𝐬𝐭 𝐦𝐞𝐦𝐨𝐫𝐲 𝐚𝐝𝐝𝐫𝐞𝐬𝐬 (00).
The 𝐦𝐨𝐬𝐭 𝐬𝐢𝐠𝐧𝐢𝐟𝐢𝐜𝐚𝐧𝐭 𝐛𝐲𝐭𝐞 (00) is stored at the 𝐡𝐢𝐠𝐡𝐞𝐬𝐭 𝐚𝐝𝐝𝐫𝐞𝐬𝐬 (03).
This "reversal" of bytes is common in the Bitcoin Core codebase.
In bitcoin, most data like transaction IDs, block headers, and amounts are all in little-endian format or with the bytes reversed.
This time, the 𝐥𝐞𝐚𝐬𝐭 𝐬𝐢𝐠𝐧𝐢𝐟𝐢𝐜𝐚𝐧𝐭 𝐛𝐲𝐭𝐞 (4E) is stored at the 𝐥𝐨𝐰𝐞𝐬𝐭 𝐦𝐞𝐦𝐨𝐫𝐲 𝐚𝐝𝐝𝐫𝐞𝐬𝐬 (00).
The 𝐦𝐨𝐬𝐭 𝐬𝐢𝐠𝐧𝐢𝐟𝐢𝐜𝐚𝐧𝐭 𝐛𝐲𝐭𝐞 (00) is stored at the 𝐡𝐢𝐠𝐡𝐞𝐬𝐭 𝐚𝐝𝐝𝐫𝐞𝐬𝐬 (03).
This "reversal" of bytes is common in the Bitcoin Core codebase.
In bitcoin, most data like transaction IDs, block headers, and amounts are all in little-endian format or with the bytes reversed.
 𝑁𝑜𝑡𝑒: 𝐸𝑛𝑑𝑖𝑎𝑛𝑛𝑒𝑠𝑠 𝑜𝑛𝑙𝑦 𝑎𝑝𝑝𝑙𝑖𝑒𝑠 𝑡𝑜 𝑖𝑛𝑡𝑒𝑔𝑒𝑟𝑠. 𝐼𝑡 𝑖𝑠 𝑛𝑜𝑡 𝑐𝑜𝑟𝑟𝑒𝑐𝑡 𝑡𝑜 𝑠𝑎𝑦 𝑎 ℎ𝑎𝑠ℎ 𝑖𝑠 𝑙𝑖𝑡𝑡𝑙𝑒-𝑒𝑛𝑑𝑖𝑎𝑛. 𝑆𝑖𝑛𝑐𝑒 𝑡ℎ𝑒𝑟𝑒’𝑠 𝑛𝑜 𝑜𝑓𝑓𝑖𝑐𝑖𝑎𝑙 𝑡𝑒𝑟𝑚 𝑓𝑜𝑟 𝑡ℎ𝑖𝑠 𝑤𝑒 𝑠𝑎𝑦 “𝑏𝑦𝑡𝑒 𝑠𝑤𝑎𝑝𝑝𝑒𝑑” 𝑜𝑟 “𝑟𝑒𝑣𝑒𝑟𝑠𝑒 𝑏𝑦𝑡𝑒𝑠”.
For readability, the bytes are swapped back to the style of big-endian when this data is displayed to humans. A block explorer is one example of where you can see this.
Bitcoin Core’s JSON-RPC interface was the first time block hashes were printed for human consumption. That was when someone decided to reverse the ordering of hash so that it looked like a human readable integer.
𝑁𝑜𝑡𝑒: 𝐸𝑛𝑑𝑖𝑎𝑛𝑛𝑒𝑠𝑠 𝑜𝑛𝑙𝑦 𝑎𝑝𝑝𝑙𝑖𝑒𝑠 𝑡𝑜 𝑖𝑛𝑡𝑒𝑔𝑒𝑟𝑠. 𝐼𝑡 𝑖𝑠 𝑛𝑜𝑡 𝑐𝑜𝑟𝑟𝑒𝑐𝑡 𝑡𝑜 𝑠𝑎𝑦 𝑎 ℎ𝑎𝑠ℎ 𝑖𝑠 𝑙𝑖𝑡𝑡𝑙𝑒-𝑒𝑛𝑑𝑖𝑎𝑛. 𝑆𝑖𝑛𝑐𝑒 𝑡ℎ𝑒𝑟𝑒’𝑠 𝑛𝑜 𝑜𝑓𝑓𝑖𝑐𝑖𝑎𝑙 𝑡𝑒𝑟𝑚 𝑓𝑜𝑟 𝑡ℎ𝑖𝑠 𝑤𝑒 𝑠𝑎𝑦 “𝑏𝑦𝑡𝑒 𝑠𝑤𝑎𝑝𝑝𝑒𝑑” 𝑜𝑟 “𝑟𝑒𝑣𝑒𝑟𝑠𝑒 𝑏𝑦𝑡𝑒𝑠”.
For readability, the bytes are swapped back to the style of big-endian when this data is displayed to humans. A block explorer is one example of where you can see this.
Bitcoin Core’s JSON-RPC interface was the first time block hashes were printed for human consumption. That was when someone decided to reverse the ordering of hash so that it looked like a human readable integer.
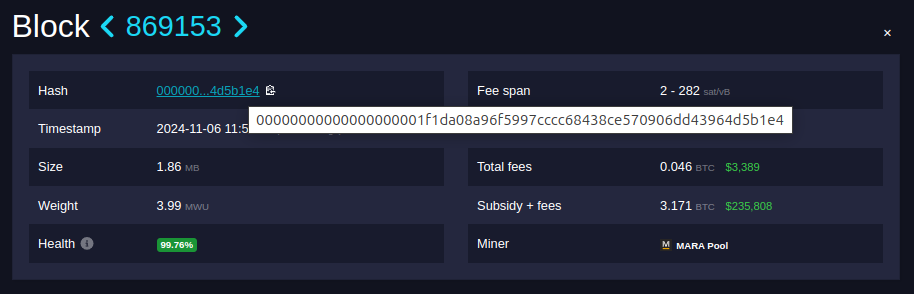 It turns out the real block hash, the actual sha256 value you get if you compute the hash yourself, is:
e4b1d56439d46d9070e58c4368cccc97596fa908daf101000000000000000000
The zeros are actually on the right! At first glance it looks like this is a very large number, but we know the integer value of a block hash actually gets smaller as the difficulty increases.
It's clear that the bytes are reversed and in the style of little-endian. But why? We can thank Satoshi for that. Satoshi decided to interpret the block hash as a little-endian integer. The more zeroes there are on the right side, the smaller the (little-endian) integer.
Since most modern CPUs are little-endian, bitcoin uses it to optimize performance.
However, network protocols typically use big-endian, creating a mismatch 🙀
Big-endian is used for network communication (network byte order). Little-endian is used for bitcoin’s internal storage.
This duality requires developers to frequently, and sometimes frustratingly, convert between the two formats when working with bitcoin data.
Have you been the victim of an endianness oversight when writing bitcoin code? It's a common source of pain for developers new to bitcoin (and even the seasoned ones!)
As covered by the transaction ID example earlier, byte order confusion can be common.
It turns out the real block hash, the actual sha256 value you get if you compute the hash yourself, is:
e4b1d56439d46d9070e58c4368cccc97596fa908daf101000000000000000000
The zeros are actually on the right! At first glance it looks like this is a very large number, but we know the integer value of a block hash actually gets smaller as the difficulty increases.
It's clear that the bytes are reversed and in the style of little-endian. But why? We can thank Satoshi for that. Satoshi decided to interpret the block hash as a little-endian integer. The more zeroes there are on the right side, the smaller the (little-endian) integer.
Since most modern CPUs are little-endian, bitcoin uses it to optimize performance.
However, network protocols typically use big-endian, creating a mismatch 🙀
Big-endian is used for network communication (network byte order). Little-endian is used for bitcoin’s internal storage.
This duality requires developers to frequently, and sometimes frustratingly, convert between the two formats when working with bitcoin data.
Have you been the victim of an endianness oversight when writing bitcoin code? It's a common source of pain for developers new to bitcoin (and even the seasoned ones!)
As covered by the transaction ID example earlier, byte order confusion can be common.
 Another gotcha is length specification. When converting to little-endian, always specify the correct byte length:
 Hope you learned something new about endianness today. If you enjoyed this, share it with a friend and don’t forget to follow us,

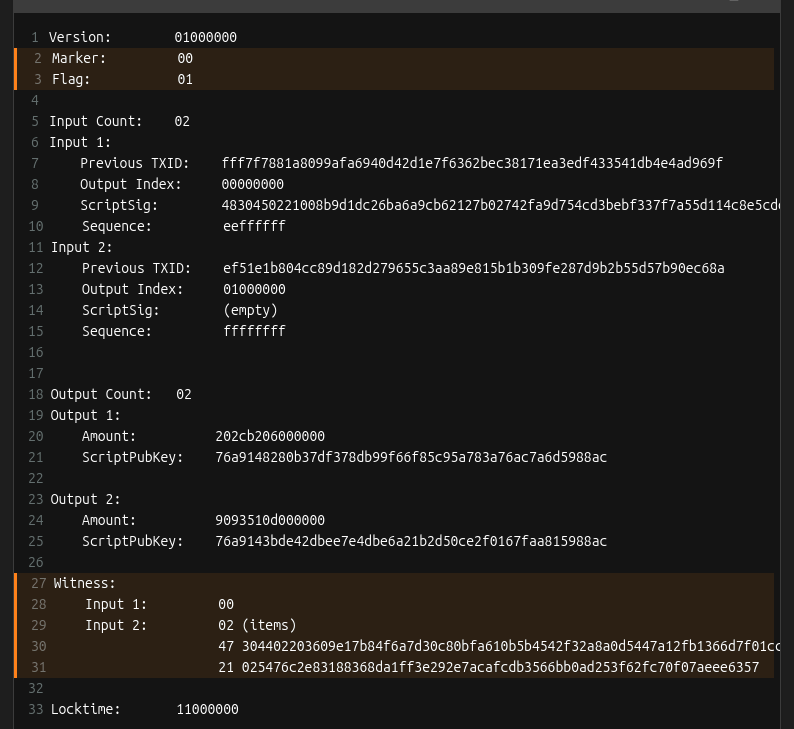
 UTXOs are unspent transaction outputs. They can be used as inputs for new transactions.
Think of them as "coins" in a wallet, waiting to be spent.
Alice checks her wallet and finds two UTXOs:
UTXOs are unspent transaction outputs. They can be used as inputs for new transactions.
Think of them as "coins" in a wallet, waiting to be spent.
Alice checks her wallet and finds two UTXOs:
 To create a transaction, Alice has to specify exactly which UTXOs to spend.
A UTXO is identified by the transaction it came from, specifically
- the transaction ID and
- an index that says where the UTXO is in the list of transaction outputs
To create a transaction, Alice has to specify exactly which UTXOs to spend.
A UTXO is identified by the transaction it came from, specifically
- the transaction ID and
- an index that says where the UTXO is in the list of transaction outputs
 Wallets usually store this information for you but you can also look it up on the blockchain.
Alice's wallet shows these available UTXOs:
- UTXO #1: 4 BTC (from Transaction 1, Output Index 1)
- UTXO #2: 2 BTC (from Transaction 2, Output Index 0)
Together, they provide enough funds (4 BTC + 2 BTC = 6 BTC) for the payment and any transaction fees.
Now Alice has everything she needs to identify her UTXOs. As she adds them to the transaction, she saves space for the signatures she will make later. These signatures authorize the spending of the UTXOs.
Wallets usually store this information for you but you can also look it up on the blockchain.
Alice's wallet shows these available UTXOs:
- UTXO #1: 4 BTC (from Transaction 1, Output Index 1)
- UTXO #2: 2 BTC (from Transaction 2, Output Index 0)
Together, they provide enough funds (4 BTC + 2 BTC = 6 BTC) for the payment and any transaction fees.
Now Alice has everything she needs to identify her UTXOs. As she adds them to the transaction, she saves space for the signatures she will make later. These signatures authorize the spending of the UTXOs.
 Now that the transaction inputs have been taken care of, it’s time to look at the outputs!
Alice needs to create two outputs:
- 5 BTC to Bob (the payment amount)
- 0.99 BTC back to Alice as change (there is a 0.01 BTC transaction fee)
Now that the transaction inputs have been taken care of, it’s time to look at the outputs!
Alice needs to create two outputs:
- 5 BTC to Bob (the payment amount)
- 0.99 BTC back to Alice as change (there is a 0.01 BTC transaction fee)
 Why do we have to make a separate output for change?
UTXOs must be spent in their entirety. You cannot partially spend a UTXO. Instead, you create a new output that sends the excess amount back to yourself as change.
Why do we have to make a separate output for change?
UTXOs must be spent in their entirety. You cannot partially spend a UTXO. Instead, you create a new output that sends the excess amount back to yourself as change.
 Looks good! The transaction structure is now complete, but it’s not yet valid. Alice must sign it to prove she owns the inputs. We’ll cover that in a future lesson 🙂
Follow us
Looks good! The transaction structure is now complete, but it’s not yet valid. Alice must sign it to prove she owns the inputs. We’ll cover that in a future lesson 🙂
Follow us