8 Tips For Striking Black & White Street Photography With iPhone Would you like to capture stunning
# 8 Tips For Striking Black & White Street Photography With iPhone
Would you like to capture stunning [black and white street photos]()? Just follow these 8 iPhone street photography tips… and you’ll be taking incredible black and white street photos with the only camera that’s always in your pocket!
 )
1\. Shoot In Black & White
--------------------------
Did you know the [iPhone camera](
)
1\. Shoot In Black & White
--------------------------
Did you know the [iPhone camera](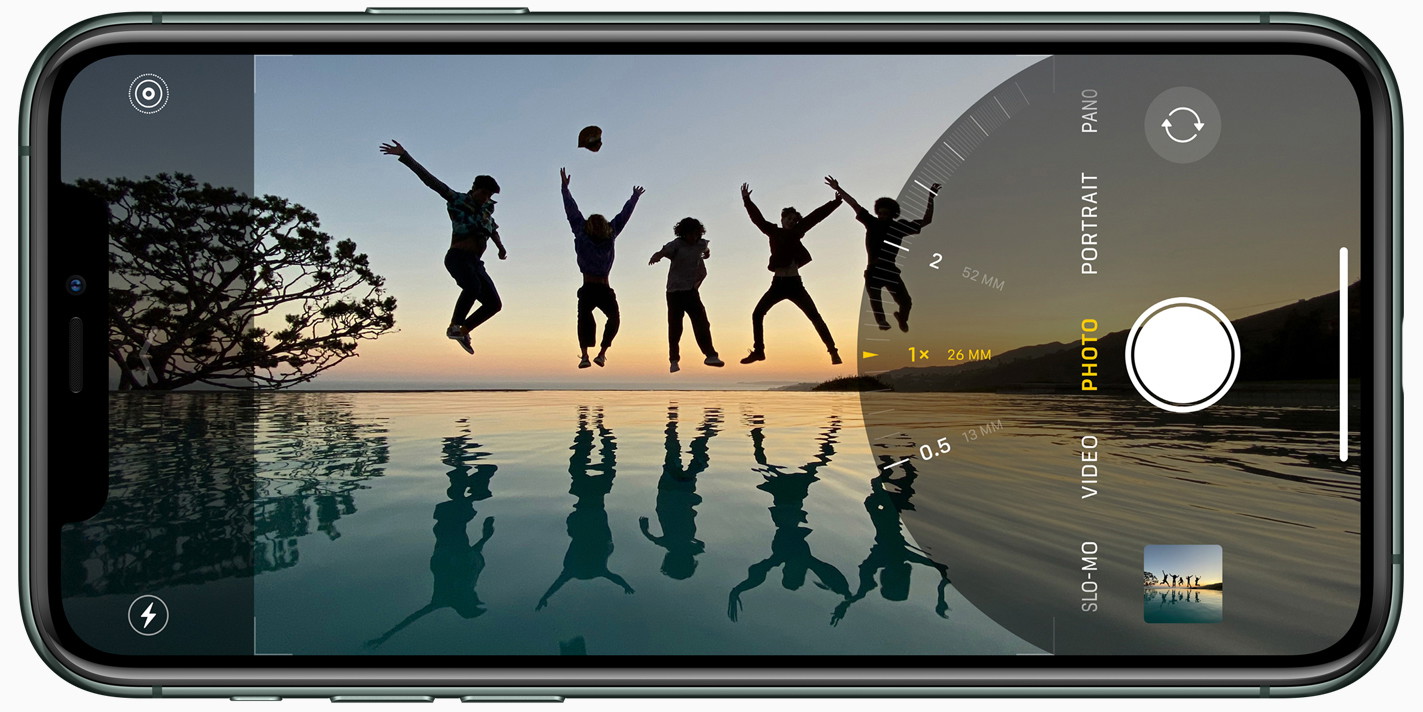 ) lets you shoot in black and white?
Most people shoot in color and convert to black and white later. But for the best results, you should shoot in black and white.
(Don’t worry, you can always convert the photo back to color later!)
 lets you shoot in black and white?
Most people shoot in color and convert to black and white later. But for the best results, you should shoot in black and white.
(Don’t worry, you can always convert the photo back to color later!)
 )
So why shoot your street photos in black and white?
Well, there are certain elements that make a black and white photo successful… light, shadows, patterns, shapes, lines, etc.
Removing the color allows you to see these elements more clearly.
Shapes, lines, and patterns will stand out. And you can instantly see whether a particular kind of light will work in black and white.
 )
So how do you shoot in black and white on the iPhone?
It’s super easy!
Simply open the [iPhone Camera app](). Then swipe up on the screen (or tap the little arrow at the top of the screen).
Swipe across the icons above the shutter button and tap the **Filters** icon (three circles). Then swipe across the filter styles and select **Noir**.
 )
Now you can shoot your photos in black and white!
Note that the iPhone camera filters are non-destructive. This means you can change them _after_ taking a photo!
So if you decide you want your photo in color, just go to the **Edit** option in the Photos app and select a different filter.
2\. Capture Minimalist Black & White Street Photos
--------------------------------------------------
The best photos are often the simplest ones!
The fewer elements you have in your photos, the more eye-catching they’ll be.
 )
This is especially true for black and white street photography.
So if you want to capture striking black and white street photos, you should aim for [minimalist compositions]().
And the best way to do that?
Include lots of [empty “negative” space](
)
This is especially true for black and white street photography.
So if you want to capture striking black and white street photos, you should aim for [minimalist compositions]().
And the best way to do that?
Include lots of [empty “negative” space]( ) in your photos.
 in your photos.
 )
But how do you find empty space in an urban environment?
Well, it might sound challenging. But it’s easier than you think!
The best way to create minimalist street photos is to find an open space in the city. Squares, parks, and cultural sites are great places for minimalist street photography.
If you’re not familiar with the city, you can easily find these kinds of spaces by exploring Google Maps.
 )
Now, just wait for a single human subject to appear in the scene. Compose your shot so the person has a huge amount of empty space around them.
The negative space allows you to control the viewer’s attention. It guarantees the viewer’s eye will be drawn toward the subject.
When [composing your photo](), think about where you want the subject to appear in the frame.
I usually like to have my subject in the center of the photo as this often has the most impact. But you can experiment and take several photos with the subject in different positions.
 )
Finally, make sure you avoid any unnecessary visual distractions. You might need to adjust your position or shoot from a different angle to avoid unwanted elements in your frame.
[Shooting from a low angle](
)
Finally, make sure you avoid any unnecessary visual distractions. You might need to adjust your position or shoot from a different angle to avoid unwanted elements in your frame.
[Shooting from a low angle](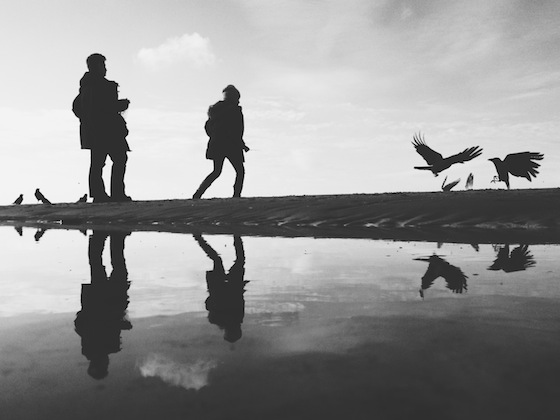 ) is a great way to get more sky in the frame and eliminate a distracting foreground.
 is a great way to get more sky in the frame and eliminate a distracting foreground.
 )
3\. Use Leading Lines In Your iPhone Street Photography
-------------------------------------------------------
The most important goal for us as photographers is to control the viewer’s attention…
And there’s no better way to do that than using [leading lines]()!

3\. Use Leading Lines In Your iPhone Street Photography
-------------------------------------------------------
The most important goal for us as photographers is to control the viewer’s attention…
And there’s no better way to do that than using [leading lines]()!
 )
Leading lines literally lead the viewer’s eye to the subject. And they [add amazing depth](
)
Leading lines literally lead the viewer’s eye to the subject. And they [add amazing depth]( ) to your images.
Cities are full of leading lines that you can use in your iPhone street photography.
Roads, paths, bridges, walls, fences, road markings, tunnels, underpasses, and other architectural elements can be used as leading lines.
 to your images.
Cities are full of leading lines that you can use in your iPhone street photography.
Roads, paths, bridges, walls, fences, road markings, tunnels, underpasses, and other architectural elements can be used as leading lines.
 )
Simply position yourself so the line leads from the foreground into the distance.
Ideally, you want your subject to be at the point where the lines converge in the distance.

Simply position yourself so the line leads from the foreground into the distance.
Ideally, you want your subject to be at the point where the lines converge in the distance.
 )
For the most powerful visual impact, compose your shot with the lines starting from the corners of the frame.
This will add more structure and completeness to your photo. And it draws the eye right from the foreground of the scene.
But don’t worry if you don’t get the lines perfectly positioned. You can always crop the photo later to create the perfect composition.
 )
Most leading lines in cities are straight. But don’t forget to look for curved leading lines, such as spiral staircases. These will create truly magical images!
For the perfect shot, climb to the top of the staircase and shoot downwards to capture the beautiful spiral line.

Most leading lines in cities are straight. But don’t forget to look for curved leading lines, such as spiral staircases. These will create truly magical images!
For the perfect shot, climb to the top of the staircase and shoot downwards to capture the beautiful spiral line.
 )
If possible, capture a person somewhere along the line or even right at the bottom of the staircase.
But spiral staircases look great by themselves, so always capture a few shots even if there’s no person in the scene.

If possible, capture a person somewhere along the line or even right at the bottom of the staircase.
But spiral staircases look great by themselves, so always capture a few shots even if there’s no person in the scene.
 )
4\. Look For Patterns In The Urban Landscape
--------------------------------------------
[Patterns]() offer another way to make your black and white street photography more interesting.
I love patterns so much!
Repetitive patterns instantly catch the eye. And they hold the viewer’s attention while they spend time examining the details.
 )
In cities, you’ll find all sorts of patterns in modern buildings and architecture.
Many modern buildings have facades with repeating shapes or lines. Even a row of windows, pillars, or arches can be used to create patterns in your photos.

In cities, you’ll find all sorts of patterns in modern buildings and architecture.
Many modern buildings have facades with repeating shapes or lines. Even a row of windows, pillars, or arches can be used to create patterns in your photos.
 )
If you’re not familiar with the city, use Google to search for images of modern buildings in the city. You can also use Instagram or Google Maps Street View to preview images from the area.
Once you start looking, you’ll find so many modern buildings with patterns you could photograph.

If you’re not familiar with the city, use Google to search for images of modern buildings in the city. You can also use Instagram or Google Maps Street View to preview images from the area.
Once you start looking, you’ll find so many modern buildings with patterns you could photograph.
 )
When you’ve found a scene with a repetitive pattern, decide which angle you want to shoot from.
I usually like to shoot straight toward the building, creating a [symmetrical composition](
)
When you’ve found a scene with a repetitive pattern, decide which angle you want to shoot from.
I usually like to shoot straight toward the building, creating a [symmetrical composition](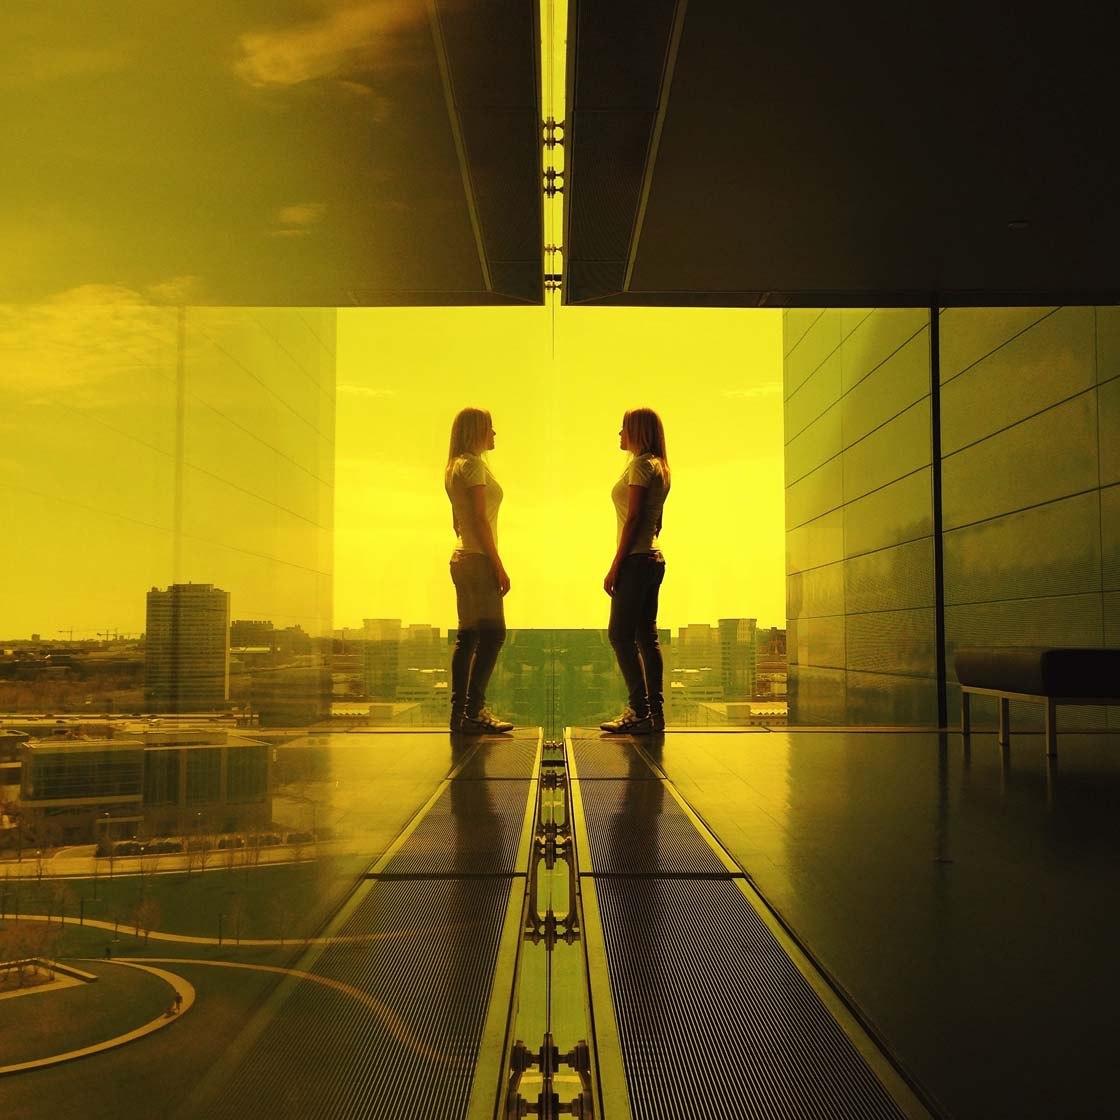 ).
.
 )
But shooting from a side-on angle can also work… as you’ll see in the photo below.

But shooting from a side-on angle can also work… as you’ll see in the photo below.
 )
When you’ve composed your shot, just wait for a person to enter the scene.
The pattern will create an amazing backdrop. The person will add a strong focal point and give meaning to the image.

When you’ve composed your shot, just wait for a person to enter the scene.
The pattern will create an amazing backdrop. The person will add a strong focal point and give meaning to the image.
 )
5\. Frame Your Subject With Architectural Elements
--------------------------------------------------
Here’s a great technique to draw attention to your street photography subjects…
[Frame your subject](
)
5\. Frame Your Subject With Architectural Elements
--------------------------------------------------
Here’s a great technique to draw attention to your street photography subjects…
[Frame your subject]( ) with architectural elements!
 with architectural elements!
 )
This technique works so well in black and white street photography. The strong shape of the frame stands out more clearly when you remove the color from the scene.
There are many opportunities to use framing in the city. Archways, tunnels, doorways, and windows make great frames for your photos.

This technique works so well in black and white street photography. The strong shape of the frame stands out more clearly when you remove the color from the scene.
There are many opportunities to use framing in the city. Archways, tunnels, doorways, and windows make great frames for your photos.
 )
Once you find a good “frame,” compose your shot and wait for a person to walk into the scene.
Use [burst mode]() to capture multiple shots as the person walks through the frame. You can then choose the best photo with the subject in the perfect position and pose.
To activate burst mode, drag the shutter button to the left. Or hold down the volume-up button on the side of your iPhone.
 )
I love to create symmetrical compositions with the subject in the center of the photo. But having the subject nearer the edge of the frame can also work.

I love to create symmetrical compositions with the subject in the center of the photo. But having the subject nearer the edge of the frame can also work.
 )
If you’re shooting from inside looking out toward the light, you might need to adjust exposure (image brightness).
Often, you’ll need to reduce exposure to ensure the bright areas don’t lose their detail.
I usually start by reducing exposure to -1. But sometimes you’ll need to drop it further, e.g. to -2.
 )
To adjust exposure in the iPhone Camera app, swipe up (or press the arrow at the top of the screen). Tap the **+/-** icon near the bottom of the screen. Then use the slider to adjust the exposure.

To adjust exposure in the iPhone Camera app, swipe up (or press the arrow at the top of the screen). Tap the **+/-** icon near the bottom of the screen. Then use the slider to adjust the exposure.
 )
Once you’ve set the exposure value, you can keep taking photos and the exposure will remain at that setting. Just remember to set it back to zero after!
Note that older iPhones don’t have this exposure value setting. But you can also adjust exposure by tapping on the screen to set focus and then swiping up or down.
 )
When you reduce exposure, keep in mind that the shadows will become darker – sometimes even pure black. And while you will lose some detail in the shadows, it can actually look really great.
You’ll see exactly what I mean in the next tip!
6\. Shoot Striking Silhouette Street Photos
-------------------------------------------
Have you ever tried capturing [silhouettes in your photos](
)
When you reduce exposure, keep in mind that the shadows will become darker – sometimes even pure black. And while you will lose some detail in the shadows, it can actually look really great.
You’ll see exactly what I mean in the next tip!
6\. Shoot Striking Silhouette Street Photos
-------------------------------------------
Have you ever tried capturing [silhouettes in your photos](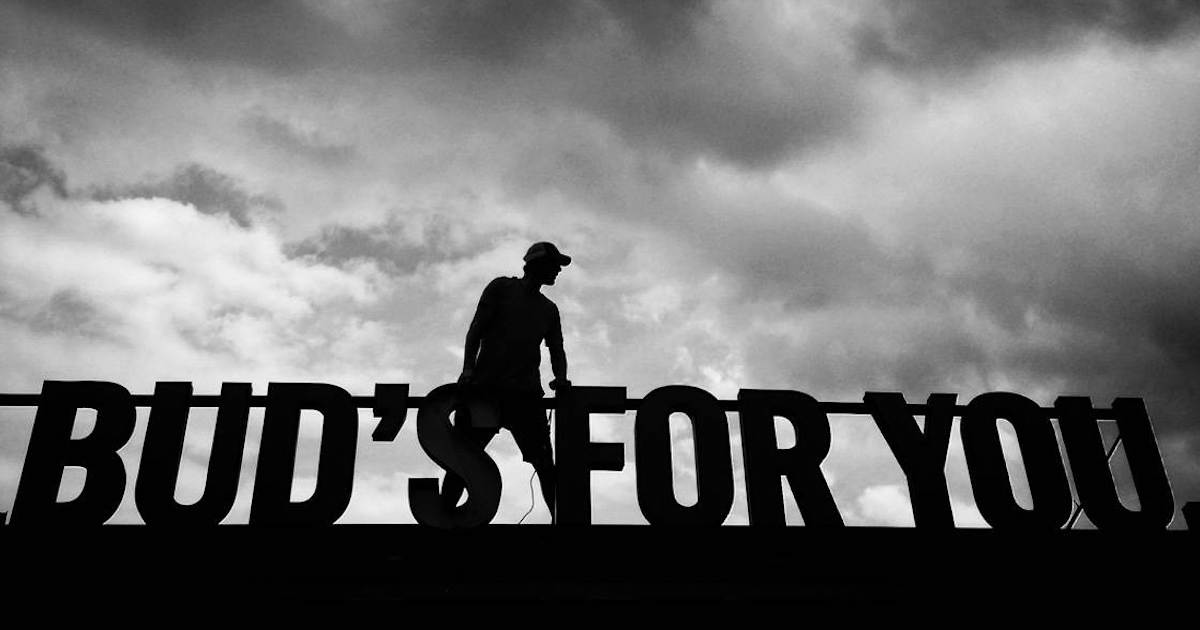 )?
Silhouettes are perfect for creative street photography. And they look amazing in black and white!
?
Silhouettes are perfect for creative street photography. And they look amazing in black and white!
 )
The dark outline of your subject will grab the viewer’s attention. And the lack of detail adds a sense of [mystery and intrigue]()!
So how do you shoot silhouette photos with the iPhone?
First, you need to shoot toward the light… with your subject in front of the bright background.

The dark outline of your subject will grab the viewer’s attention. And the lack of detail adds a sense of [mystery and intrigue]()!
So how do you shoot silhouette photos with the iPhone?
First, you need to shoot toward the light… with your subject in front of the bright background.
 )
The [golden hours of sunrise and sunset]() are perfect for silhouette photography. When the sun is close to the horizon, it’s easy to get the bright light behind your subject.
But a bright sky at other times of the day can work. Or try using other light sources, such as street lights, illuminated shop windows, or even a brightly-lit wall.
 )
If you’re shooting against the sky, try shooting from a lower angle to get more bright sky behind your subject.

If you’re shooting against the sky, try shooting from a lower angle to get more bright sky behind your subject.
 )
When you’ve composed your shot, reduce exposure to make the image darker. Remember, the goal is to have the subject as a dark outline against the brighter background.

When you’ve composed your shot, reduce exposure to make the image darker. Remember, the goal is to have the subject as a dark outline against the brighter background.
 )
To reduce exposure, you can tap the screen where you want to set focus, then swipe down to make the image darker.
On newer iPhones, you can also swipe up on the screen (or press the arrow at the top of the screen) and tap the **+/-** icon. Then use the slider to adjust exposure.

To reduce exposure, you can tap the screen where you want to set focus, then swipe down to make the image darker.
On newer iPhones, you can also swipe up on the screen (or press the arrow at the top of the screen) and tap the **+/-** icon. Then use the slider to adjust exposure.
 )
7\. Use Shadows For More Unique Street Photos
---------------------------------------------
Do you want to shoot more unique black and white street photos?
Then try using [shadows in your images]()!
This technique isn’t used by many people. So your photos will definitely stand out!

7\. Use Shadows For More Unique Street Photos
---------------------------------------------
Do you want to shoot more unique black and white street photos?
Then try using [shadows in your images]()!
This technique isn’t used by many people. So your photos will definitely stand out!
 )
Shadows add mystery and drama to your image. And they really grab the viewer’s attention.
Now, you won’t get shadows on an overcast day. So you’ll need to shoot when there’s [direct sunlight]() in the scene.
The best time of day to shoot shadows is during golden hour (just after sunrise or just before sunset). When the sun is low on the horizon, you’ll get amazing long shadows.
 )
Just like silhouette photography, you’ll need to reduce exposure to make the shadows dark and dramatic.
Don’t worry about losing detail in the shadows. This can actually create a really powerful image!

Just like silhouette photography, you’ll need to reduce exposure to make the shadows dark and dramatic.
Don’t worry about losing detail in the shadows. This can actually create a really powerful image!
 )
When photographing shadows, remember the basic elements that make a great black and white street photo… leading lines, patterns, frames, etc.
The only difference is that you’re capturing the shadows of subjects instead of the subjects themselves.
And of course, this is a great opportunity to include yourself (well, your shadow) in the photo!
 )
8\. Clean Up Your Street Photos In Editing
------------------------------------------
Shooting with the iPhone Noir filter is a great start for your black and white street photos. But you can improve your photos even further in post-processing.

8\. Clean Up Your Street Photos In Editing
------------------------------------------
Shooting with the iPhone Noir filter is a great start for your black and white street photos. But you can improve your photos even further in post-processing.
 )
There are plenty of [iPhone photo editing apps](
)
There are plenty of [iPhone photo editing apps]( ) you can use.
I like to use [Lightroom](https://apps.apple.com/us/app/lightroom-photo-video-editor/id878783582). But the [built-in Photos app](
) you can use.
I like to use [Lightroom](https://apps.apple.com/us/app/lightroom-photo-video-editor/id878783582). But the [built-in Photos app](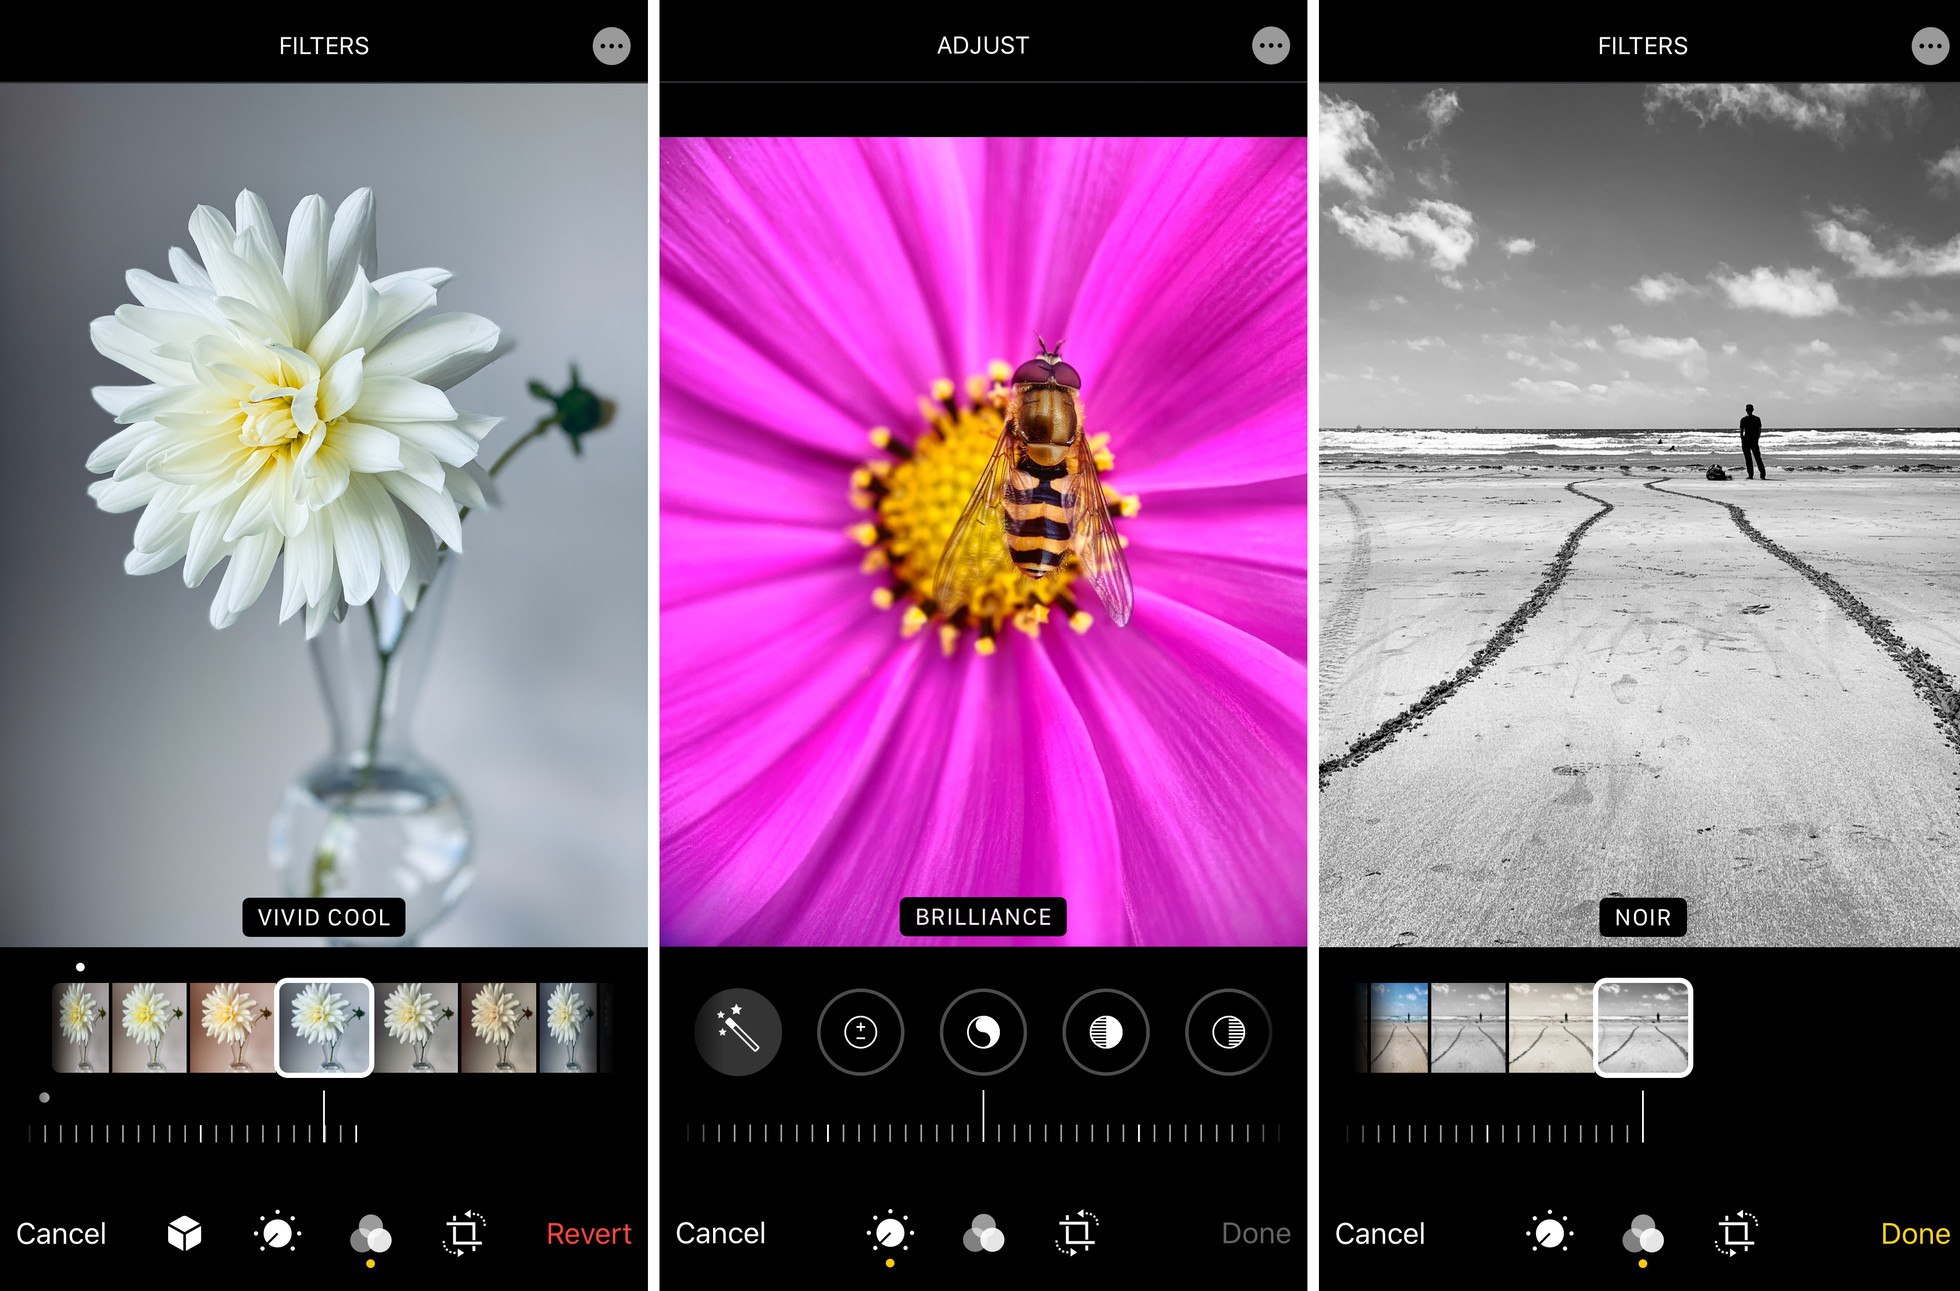 ) has a great set of editing tools which are perfect for beginners.
Simple adjustments to brightness, contrast, shadows, and highlights can make a big difference to the final image.
 has a great set of editing tools which are perfect for beginners.
Simple adjustments to brightness, contrast, shadows, and highlights can make a big difference to the final image.
 ) ![black-and-white-street-photography-with-iPhone]()
_\[Drag the slider to compare the original and edited images\]_
When it comes to black and white photography, increasing the contrast (or adjusting shadows and highlights) is a great place to start. A simple adjustment can add drama to your image and really make it stand out!
Cropping is another simple, yet powerful, way to improve your images.
Why? Because it can be hard to achieve perfect composition at the time of shooting.
Perhaps you shot too wide and want to crop in to make your subject stand out. Or maybe you didn’t notice distracting elements at the edges of the frame.
 ![black-and-white-street-photography-with-iPhone]()
_\[Drag the slider to compare the original and edited images\]_
When it comes to black and white photography, increasing the contrast (or adjusting shadows and highlights) is a great place to start. A simple adjustment can add drama to your image and really make it stand out!
Cropping is another simple, yet powerful, way to improve your images.
Why? Because it can be hard to achieve perfect composition at the time of shooting.
Perhaps you shot too wide and want to crop in to make your subject stand out. Or maybe you didn’t notice distracting elements at the edges of the frame.
 )
Perhaps the horizon appears slightly tilted. Or maybe you didn’t get your leading lines starting right in the corners of the frame.
All of these issues can be fixed with the Crop tool.

Perhaps the horizon appears slightly tilted. Or maybe you didn’t get your leading lines starting right in the corners of the frame.
All of these issues can be fixed with the Crop tool.
 )
Remember, the most powerful photos are usually the simplest ones. For stunning minimalist street photos, you’ll need to remove distracting objects from images.
The cleaner the better!

Remember, the most powerful photos are usually the simplest ones. For stunning minimalist street photos, you’ll need to remove distracting objects from images.
The cleaner the better!
 )
Luckily, there are several apps that make it easy to remove objects (or people) from your photos. [Adobe Lightroom](https://apps.apple.com/us/app/lightroom-photo-video-editor/id878783582) and [TouchRetouch](https://apps.apple.com/us/app/touchretouch/id373311252) both have tools for cleaning up your photos.

Luckily, there are several apps that make it easy to remove objects (or people) from your photos. [Adobe Lightroom](https://apps.apple.com/us/app/lightroom-photo-video-editor/id878783582) and [TouchRetouch](https://apps.apple.com/us/app/touchretouch/id373311252) both have tools for cleaning up your photos.
 )
In the example above, I used the Healing tool in Lightroom to simply brush over the sign and make it disappear!

In the example above, I used the Healing tool in Lightroom to simply brush over the sign and make it disappear!
 )   )
-------------
[Source]()
)
-------------
[Source]()
)
1\. Shoot In Black & White
--------------------------
Did you know the [iPhone camera](iPhone Photography School
How To Use The iPhone Camera App To Take Incredible Photos
Learn how to use your iPhone Camera app to take stunning photos. And discover hidden iPhone camera features that you never knew were there!
)
So why shoot your street photos in black and white?
Well, there are certain elements that make a black and white photo successful… light, shadows, patterns, shapes, lines, etc.
Removing the color allows you to see these elements more clearly.
Shapes, lines, and patterns will stand out. And you can instantly see whether a particular kind of light will work in black and white.
![black and white street photography with iPhone no script]()
So how do you shoot in black and white on the iPhone?
It’s super easy!
Simply open the [iPhone Camera app](iPhone Photography School
How To Use The iPhone Camera App To Take Incredible Photos
Learn how to use your iPhone Camera app to take stunning photos. And discover hidden iPhone camera features that you never knew were there!
)
Now you can shoot your photos in black and white!
Note that the iPhone camera filters are non-destructive. This means you can change them _after_ taking a photo!
So if you decide you want your photo in color, just go to the **Edit** option in the Photos app and select a different filter.
2\. Capture Minimalist Black & White Street Photos
--------------------------------------------------
The best photos are often the simplest ones!
The fewer elements you have in your photos, the more eye-catching they’ll be.
![black and white street photography with iPhone no script]()
This is especially true for black and white street photography.
So if you want to capture striking black and white street photos, you should aim for [minimalist compositions](iPhone Photography School
10 Easy Ways To Create Stunning Minimalist Compositions
Discover 10 simple shooting and editing tips for creating incredible minimalist iPhone photos. Simplifying the scene is the key to powerful composi...
iPhone Photography School
How To Create Powerful iPhone Photos Using Negative Space
Discover the composition technique of using negative space in your photos, and how it can help you create incredibly powerful images with your iPhone.
)
But how do you find empty space in an urban environment?
Well, it might sound challenging. But it’s easier than you think!
The best way to create minimalist street photos is to find an open space in the city. Squares, parks, and cultural sites are great places for minimalist street photography.
If you’re not familiar with the city, you can easily find these kinds of spaces by exploring Google Maps.
![black and white street photography with iPhone no script]()
Now, just wait for a single human subject to appear in the scene. Compose your shot so the person has a huge amount of empty space around them.
The negative space allows you to control the viewer’s attention. It guarantees the viewer’s eye will be drawn toward the subject.
When [composing your photo](iPhone Photography School
10 iPhone Photo Composition Tips For Creating Striking Images
Discover 10 iPhone photo composition techniques that will dramatically improve your iPhone photos and make you a better photographer.
)
Finally, make sure you avoid any unnecessary visual distractions. You might need to adjust your position or shoot from a different angle to avoid unwanted elements in your frame.
[Shooting from a low angle](iPhone Photography School
10 Tips For Taking Incredible Low Angle iPhone Photos
Discover how to create unique and powerful iPhone photos by photographing your subjects from a lower angle.
)
3\. Use Leading Lines In Your iPhone Street Photography
-------------------------------------------------------
The most important goal for us as photographers is to control the viewer’s attention…
And there’s no better way to do that than using [leading lines](iPhone Photography School
How To Use Leading Lines To Create Powerful iPhone Photos
Discover how to use leading lines in your iPhone photos to create powerful compositions with a strong visual impact.
)
Leading lines literally lead the viewer’s eye to the subject. And they [add amazing depth](iPhone Photography School
5 Ways To Create A Sense Of Depth In Your iPhone Photos
Discover how to create a sense of depth and distance in your iPhone photos using leading lines, foreground interest, natural frames and a low shoot...
)
Simply position yourself so the line leads from the foreground into the distance.
Ideally, you want your subject to be at the point where the lines converge in the distance.
![black and white street photography with iPhone no script]()
For the most powerful visual impact, compose your shot with the lines starting from the corners of the frame.
This will add more structure and completeness to your photo. And it draws the eye right from the foreground of the scene.
But don’t worry if you don’t get the lines perfectly positioned. You can always crop the photo later to create the perfect composition.
![black and white street photography with iPhone no script]()
Most leading lines in cities are straight. But don’t forget to look for curved leading lines, such as spiral staircases. These will create truly magical images!
For the perfect shot, climb to the top of the staircase and shoot downwards to capture the beautiful spiral line.
![black and white street photography with iPhone no script]()
If possible, capture a person somewhere along the line or even right at the bottom of the staircase.
But spiral staircases look great by themselves, so always capture a few shots even if there’s no person in the scene.
![black and white street photography with iPhone no script]()
4\. Look For Patterns In The Urban Landscape
--------------------------------------------
[Patterns](iPhone Photography School
Create Incredible iPhone Photos Using Pattern & Repetition
Discover how to create amazing iPhone photos using pattern and repetition. Whether man-made or naturally occurring, patterns create amazing abstrac...
)
In cities, you’ll find all sorts of patterns in modern buildings and architecture.
Many modern buildings have facades with repeating shapes or lines. Even a row of windows, pillars, or arches can be used to create patterns in your photos.
![black and white street photography with iPhone no script]()
If you’re not familiar with the city, use Google to search for images of modern buildings in the city. You can also use Instagram or Google Maps Street View to preview images from the area.
Once you start looking, you’ll find so many modern buildings with patterns you could photograph.
![black and white street photography with iPhone no script]()
When you’ve found a scene with a repetitive pattern, decide which angle you want to shoot from.
I usually like to shoot straight toward the building, creating a [symmetrical composition](iPhone Photography School
How To Find & Create Amazing Symmetry In Your iPhone Photography
Learn how to spot great opportunities for symmetrical images, as well as essential composition tips to ensure perfect symmetry in your iPhone photos.
)
But shooting from a side-on angle can also work… as you’ll see in the photo below.
![black and white street photography with iPhone no script]()
When you’ve composed your shot, just wait for a person to enter the scene.
The pattern will create an amazing backdrop. The person will add a strong focal point and give meaning to the image.
![black and white street photography with iPhone no script]()
5\. Frame Your Subject With Architectural Elements
--------------------------------------------------
Here’s a great technique to draw attention to your street photography subjects…
[Frame your subject](iPhone Photography School
7 Tips For Using Framing Composition Techniques In Your iPhone Photos
Discover how to use framing composition techniques to create more compelling and interesting photos with your iPhone.
)
This technique works so well in black and white street photography. The strong shape of the frame stands out more clearly when you remove the color from the scene.
There are many opportunities to use framing in the city. Archways, tunnels, doorways, and windows make great frames for your photos.
![black and white street photography with iPhone no script]()
Once you find a good “frame,” compose your shot and wait for a person to walk into the scene.
Use [burst mode](iPhone Photography School
How To Use iPhone Burst Mode For Amazing Action Photos
Discover how to use iPhone burst mode to take perfect action shots. With burst mode, you'll never miss a great photo opportunity again!
)
I love to create symmetrical compositions with the subject in the center of the photo. But having the subject nearer the edge of the frame can also work.
![black and white street photography with iPhone no script]()
If you’re shooting from inside looking out toward the light, you might need to adjust exposure (image brightness).
Often, you’ll need to reduce exposure to ensure the bright areas don’t lose their detail.
I usually start by reducing exposure to -1. But sometimes you’ll need to drop it further, e.g. to -2.
![black and white street photography with iPhone no script]()
To adjust exposure in the iPhone Camera app, swipe up (or press the arrow at the top of the screen). Tap the **+/-** icon near the bottom of the screen. Then use the slider to adjust the exposure.
![black and white street photography with iPhone]()
Once you’ve set the exposure value, you can keep taking photos and the exposure will remain at that setting. Just remember to set it back to zero after!
Note that older iPhones don’t have this exposure value setting. But you can also adjust exposure by tapping on the screen to set focus and then swiping up or down.
![black and white street photography with iPhone no script]()
When you reduce exposure, keep in mind that the shadows will become darker – sometimes even pure black. And while you will lose some detail in the shadows, it can actually look really great.
You’ll see exactly what I mean in the next tip!
6\. Shoot Striking Silhouette Street Photos
-------------------------------------------
Have you ever tried capturing [silhouettes in your photos](iPhone Photography School
8 Tips For Stunning Black And White Silhouette Photography On iPhone
Do you want to shoot amazing black and white silhouette photography on your iPhone? Discover 8 tips for stunning black and white silhouettes.
)
The dark outline of your subject will grab the viewer’s attention. And the lack of detail adds a sense of [mystery and intrigue](iPhone Photography School
8 Tips For Moody & Mysterious Street Photography On iPhone
Discover 8 tips for moody, mysterious street photography on iPhone. Learn to shoot and edit compelling street photos with wonderful mood.
)
The [golden hours of sunrise and sunset](iPhone Photography School
8 Tips For Golden Hour Landscape Photography On iPhone
Discover 8 tips for incredible golden hour landscape photography with your iPhone. Start capturing beautiful sunrise and sunset pictures!
)
If you’re shooting against the sky, try shooting from a lower angle to get more bright sky behind your subject.
![black and white street photography with iPhone no script]()
When you’ve composed your shot, reduce exposure to make the image darker. Remember, the goal is to have the subject as a dark outline against the brighter background.
![black and white street photography with iPhone no script]()
To reduce exposure, you can tap the screen where you want to set focus, then swipe down to make the image darker.
On newer iPhones, you can also swipe up on the screen (or press the arrow at the top of the screen) and tap the **+/-** icon. Then use the slider to adjust exposure.
![black and white street photography with iPhone no script]()
7\. Use Shadows For More Unique Street Photos
---------------------------------------------
Do you want to shoot more unique black and white street photos?
Then try using [shadows in your images](iPhone Photography School
9 Tips For Capturing Incredible Shadows In Your iPhone Street Photos
Discover how to shoot amazing street photography shadows with iPhone. Use light and shade to creating compelling, mysterious street photos.
)
Shadows add mystery and drama to your image. And they really grab the viewer’s attention.
Now, you won’t get shadows on an overcast day. So you’ll need to shoot when there’s [direct sunlight](iPhone Photography School
How To Shoot Amazing Harsh Light Street Photos On iPhone
Discover how to make the most of harsh sunlight to capture incredible iPhone street photos using silhouettes, shadows, reflections and lens flare.
)
Just like silhouette photography, you’ll need to reduce exposure to make the shadows dark and dramatic.
Don’t worry about losing detail in the shadows. This can actually create a really powerful image!
![black and white street photography with iPhone no script]()
When photographing shadows, remember the basic elements that make a great black and white street photo… leading lines, patterns, frames, etc.
The only difference is that you’re capturing the shadows of subjects instead of the subjects themselves.
And of course, this is a great opportunity to include yourself (well, your shadow) in the photo!
![black and white street photography with iPhone no script]()
8\. Clean Up Your Street Photos In Editing
------------------------------------------
Shooting with the iPhone Noir filter is a great start for your black and white street photos. But you can improve your photos even further in post-processing.
![black and white street photography with iPhone no script]()
There are plenty of [iPhone photo editing apps](iPhone Photography School
The 10 Best Photo Editing Apps For iPhone (2022 Edition)
Discover the 10 best photo editing apps for improving your iPhone photos. With these apps you can turn your images into stunning masterpieces!
iPhone Photography School
How To Edit Photos On iPhone Using The Built-In Photos App
Discover how to edit photos on iPhone with the built-in editing tools in the Photos app. Create stunning edits that you'll be proud to share!
) ![black-and-white-street-photography-with-iPhone]()
_\[Drag the slider to compare the original and edited images\]_
When it comes to black and white photography, increasing the contrast (or adjusting shadows and highlights) is a great place to start. A simple adjustment can add drama to your image and really make it stand out!
Cropping is another simple, yet powerful, way to improve your images.
Why? Because it can be hard to achieve perfect composition at the time of shooting.
Perhaps you shot too wide and want to crop in to make your subject stand out. Or maybe you didn’t notice distracting elements at the edges of the frame.
![black and white street photography with iPhone no script]()
Perhaps the horizon appears slightly tilted. Or maybe you didn’t get your leading lines starting right in the corners of the frame.
All of these issues can be fixed with the Crop tool.
![black and white street photography with iPhone no script]()
Remember, the most powerful photos are usually the simplest ones. For stunning minimalist street photos, you’ll need to remove distracting objects from images.
The cleaner the better!
![black and white street photography with iPhone no script]()
Luckily, there are several apps that make it easy to remove objects (or people) from your photos. [Adobe Lightroom](https://apps.apple.com/us/app/lightroom-photo-video-editor/id878783582) and [TouchRetouch](https://apps.apple.com/us/app/touchretouch/id373311252) both have tools for cleaning up your photos.
![black and white street photography with iPhone no script]()
In the example above, I used the Healing tool in Lightroom to simply brush over the sign and make it disappear!
![black-and-white-street-photography-with-iPhone]() ![black-and-white-street-photography-with-iPhone]()
-------------
[Source](iPhone Photography School
8 Tips For Striking Black & White Street Photography With iPhone
Would you like to capture stunning black and white street photography with iPhone? Then follow these 8 street photography tips!