
Buckle up for today's #DecodingBitcoin post. It's a long one but we promise it's worth your time.
Today we're going to break down how to sign a #bitcoin segwit transaction using a real example from the BIP-143 test vectors (that’s one of the segwit BIPs!)
 𝑁𝑜𝑡𝑒: 𝑡ℎ𝑖𝑠 𝑒𝑥𝑎𝑚𝑝𝑙𝑒 𝑖𝑠 𝑓𝑜𝑟 𝑎 𝑠𝑒𝑔𝑤𝑖𝑡 𝑣0 𝑡𝑟𝑎𝑛𝑠𝑎𝑐𝑡𝑖𝑜𝑛 𝑠𝑜 𝑠𝑜𝑚𝑒 𝑜𝑓 𝑡ℎ𝑒 𝑠𝑝𝑒𝑐𝑖𝑓𝑖𝑐𝑠 𝑎𝑟𝑒 𝑑𝑖𝑓𝑓𝑒𝑟𝑒𝑛𝑡 𝑓𝑜𝑟 𝑙𝑒𝑔𝑎𝑐𝑦 𝑎𝑛𝑑 𝑡𝑎𝑝𝑟𝑜𝑜𝑡 (𝑠𝑒𝑔𝑤𝑖𝑡 𝑣1) 𝑡𝑟𝑎𝑛𝑠𝑎𝑐𝑡𝑖𝑜𝑛𝑠. 𝐻𝑜𝑤𝑒𝑣𝑒𝑟, 𝑡ℎ𝑒 𝑔𝑒𝑛𝑒𝑟𝑎𝑙 𝑐𝑜𝑛𝑐𝑒𝑝𝑡𝑠 𝑎𝑟𝑒 𝑠𝑡𝑖𝑙𝑙 𝑡ℎ𝑒 𝑠𝑎𝑚𝑒!
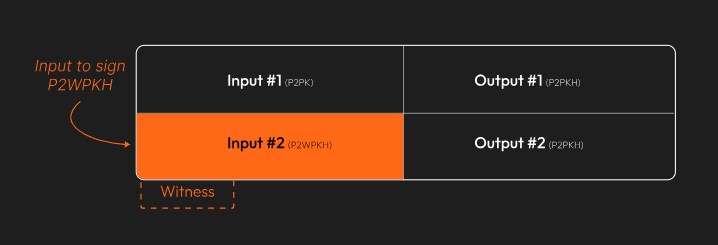
The transaction we'll be working with has two inputs. The first is a legacy P2PK input–we won’t be covering that today.
Instead, we’re going to focus on the second input, the P2WPKH (native segwit) one.
𝑁𝑜𝑡𝑒: 𝑡ℎ𝑖𝑠 𝑒𝑥𝑎𝑚𝑝𝑙𝑒 𝑖𝑠 𝑓𝑜𝑟 𝑎 𝑠𝑒𝑔𝑤𝑖𝑡 𝑣0 𝑡𝑟𝑎𝑛𝑠𝑎𝑐𝑡𝑖𝑜𝑛 𝑠𝑜 𝑠𝑜𝑚𝑒 𝑜𝑓 𝑡ℎ𝑒 𝑠𝑝𝑒𝑐𝑖𝑓𝑖𝑐𝑠 𝑎𝑟𝑒 𝑑𝑖𝑓𝑓𝑒𝑟𝑒𝑛𝑡 𝑓𝑜𝑟 𝑙𝑒𝑔𝑎𝑐𝑦 𝑎𝑛𝑑 𝑡𝑎𝑝𝑟𝑜𝑜𝑡 (𝑠𝑒𝑔𝑤𝑖𝑡 𝑣1) 𝑡𝑟𝑎𝑛𝑠𝑎𝑐𝑡𝑖𝑜𝑛𝑠. 𝐻𝑜𝑤𝑒𝑣𝑒𝑟, 𝑡ℎ𝑒 𝑔𝑒𝑛𝑒𝑟𝑎𝑙 𝑐𝑜𝑛𝑐𝑒𝑝𝑡𝑠 𝑎𝑟𝑒 𝑠𝑡𝑖𝑙𝑙 𝑡ℎ𝑒 𝑠𝑎𝑚𝑒!
The transaction we'll be working with has two inputs. The first is a legacy P2PK input–we won’t be covering that today.
Instead, we’re going to focus on the second input, the P2WPKH (native segwit) one.
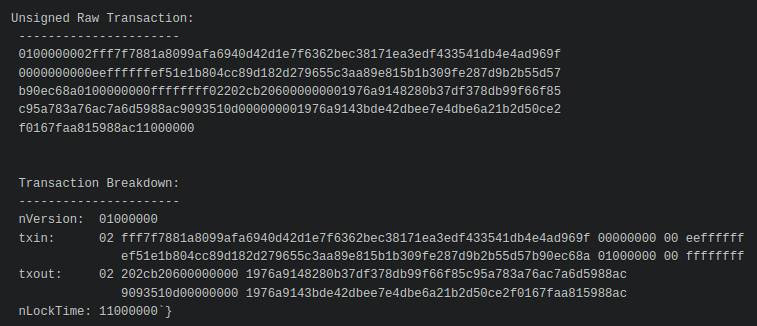
 Since this example came from one of the BIP-143 test vectors, we know what the final, signed transaction looks like. The goal is to recreate this:
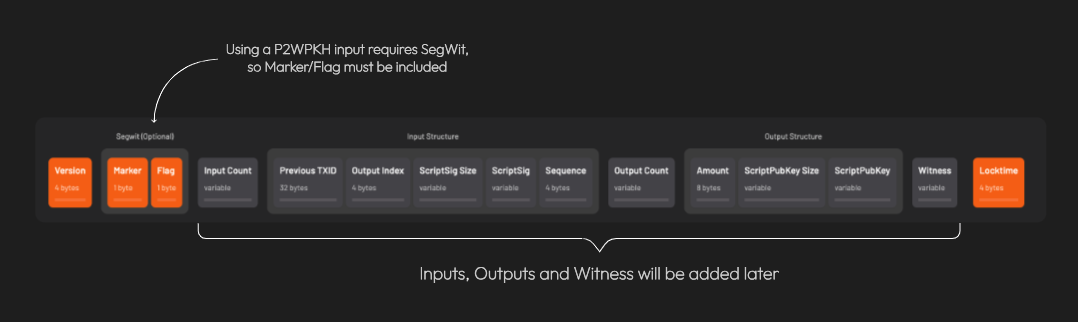
 First, we create the base transaction, the transaction without any signatures.
We’ll start with the
- version number
- marker & flag fields (to indicate the tx is segwit)
- locktime
First, we create the base transaction, the transaction without any signatures.
We’ll start with the
- version number
- marker & flag fields (to indicate the tx is segwit)
- locktime
 𝐴 𝑛𝑜𝑡𝑒 𝑜𝑛 𝑠𝑒𝑔𝑤𝑖𝑡 𝑣𝑠. 𝑙𝑒𝑔𝑎𝑐𝑦 𝑡𝑟𝑎𝑛𝑠𝑎𝑐𝑡𝑖𝑜𝑛𝑠: 𝐵𝑒𝑐𝑎𝑢𝑠𝑒 𝑎𝑡 𝑙𝑒𝑎𝑠𝑡 𝑜𝑛𝑒 𝑜𝑓 𝑡ℎ𝑒 𝑖𝑛𝑝𝑢𝑡𝑠 𝑖𝑠 𝑠𝑒𝑔𝑤𝑖𝑡 (𝑛𝑎𝑡𝑖𝑣𝑒 𝑜𝑟 𝑤𝑟𝑎𝑝𝑝𝑒𝑑), 𝑡ℎ𝑒 𝑡𝑟𝑎𝑛𝑠𝑎𝑐𝑡𝑖𝑜𝑛 𝑖𝑠 𝑎𝑙𝑠𝑜 𝑐𝑜𝑛𝑠𝑖𝑑𝑒𝑟𝑒𝑑 𝑠𝑒𝑔𝑤𝑖𝑡.
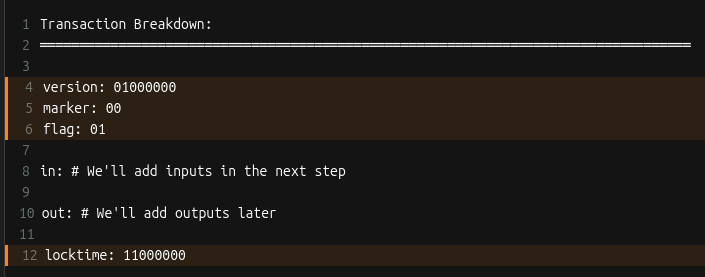
 Here’s what we have so far:
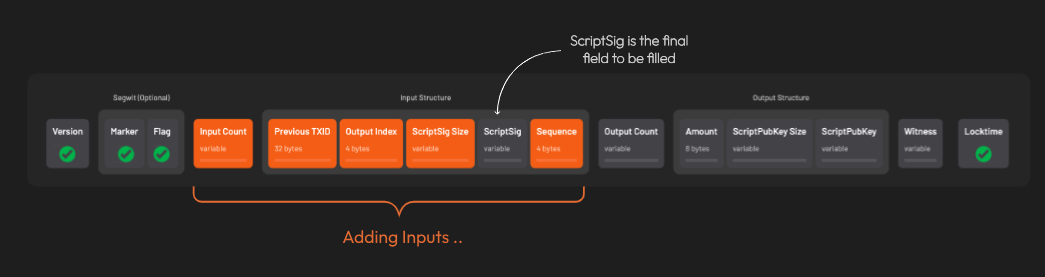
 Let’s add inputs! Recall that all inputs come from existing transactions. That means for each input, we need to find the transaction it came from and get:
1. that transaction’s ID
2. the output index
𝐖𝐡𝐚𝐭’𝐬 𝐚𝐧 𝐨𝐮𝐭𝐩𝐮𝐭 𝐢𝐧𝐝𝐞𝐱?
Every transaction has a list of outputs. The “output index” is a way to reference a specific output from the list.
We need to ask, "from a transaction’s list of outputs, which one corresponds to the input I care about?”
For each input, two more things are needed: the 𝐬𝐜𝐫𝐢𝐩𝐭𝐒𝐢𝐠 (placeholder for data required to spend the input), and a 𝐬𝐞𝐪𝐮𝐞𝐧𝐜𝐞 𝐧𝐮𝐦𝐛𝐞𝐫 (usually 0xFFFFFFFF)
Let’s add inputs! Recall that all inputs come from existing transactions. That means for each input, we need to find the transaction it came from and get:
1. that transaction’s ID
2. the output index
𝐖𝐡𝐚𝐭’𝐬 𝐚𝐧 𝐨𝐮𝐭𝐩𝐮𝐭 𝐢𝐧𝐝𝐞𝐱?
Every transaction has a list of outputs. The “output index” is a way to reference a specific output from the list.
We need to ask, "from a transaction’s list of outputs, which one corresponds to the input I care about?”
For each input, two more things are needed: the 𝐬𝐜𝐫𝐢𝐩𝐭𝐒𝐢𝐠 (placeholder for data required to spend the input), and a 𝐬𝐞𝐪𝐮𝐞𝐧𝐜𝐞 𝐧𝐮𝐦𝐛𝐞𝐫 (usually 0xFFFFFFFF)
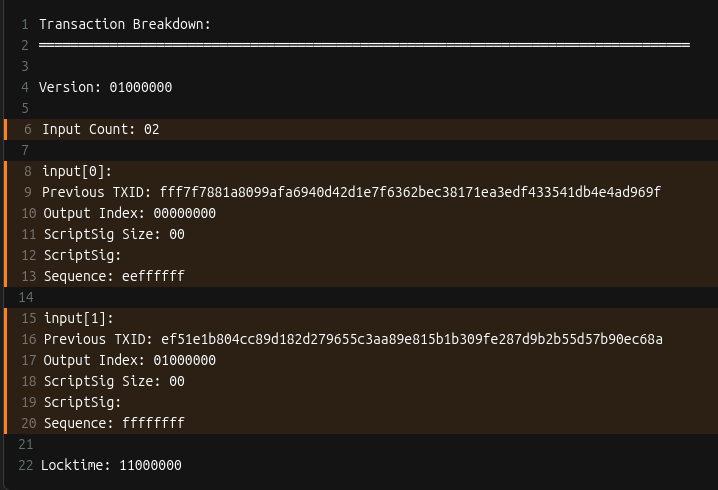
 After adding all the inputs, the transaction looks like this:
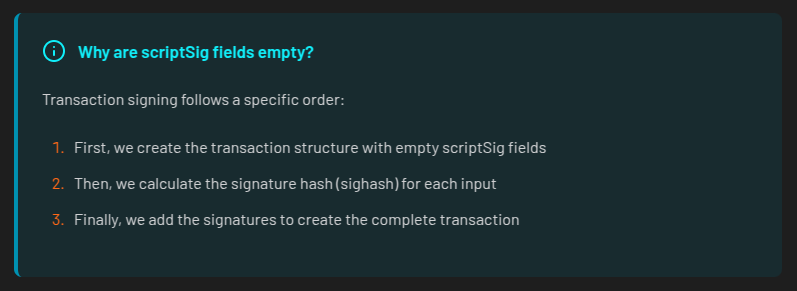
 Remember when we said the scriptSig would be a placeholder? Here’s why those fields are currently empty:
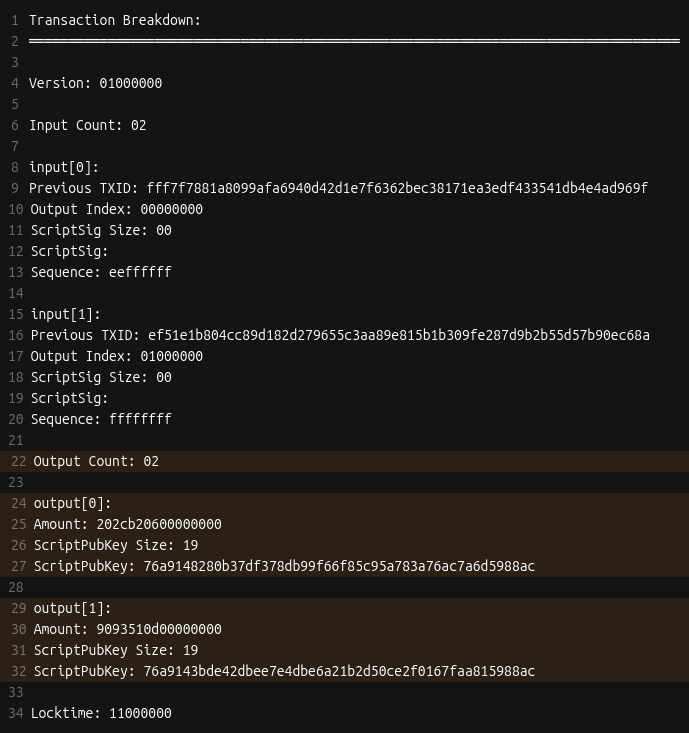
 Time to add outputs! For each output, we include the
- amount (in satoshis)
- scriptPubKey: the locking script that defines the rules for how the output can be spent
Time to add outputs! For each output, we include the
- amount (in satoshis)
- scriptPubKey: the locking script that defines the rules for how the output can be spent
 Things are starting to come together!
 A few more things are needed before we can get to signing. First is setting up the 𝐰𝐢𝐭𝐧𝐞𝐬𝐬 field.
This is where the signature and corresponding public key go for segwit transactions.
The witness field starts off empty. This is different from legacy transactions where signatures are placed directly in the scriptSig field.
A few more things are needed before we can get to signing. First is setting up the 𝐰𝐢𝐭𝐧𝐞𝐬𝐬 field.
This is where the signature and corresponding public key go for segwit transactions.
The witness field starts off empty. This is different from legacy transactions where signatures are placed directly in the scriptSig field.
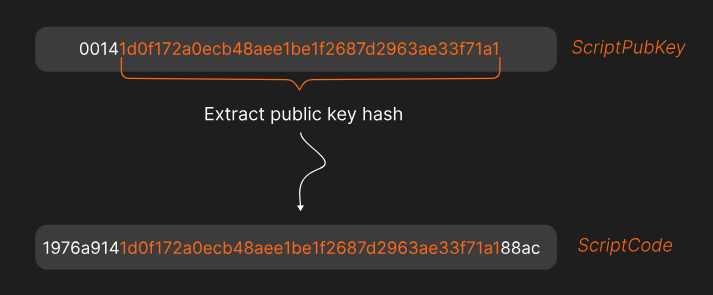
 The next thing that’s needed is the 𝐬𝐜𝐫𝐢𝐩𝐭𝐂𝐨𝐝𝐞.
The scriptCode for a P2WPKH (pay-to-witness-public-key-hash) input is:
The next thing that’s needed is the 𝐬𝐜𝐫𝐢𝐩𝐭𝐂𝐨𝐝𝐞.
The scriptCode for a P2WPKH (pay-to-witness-public-key-hash) input is:
 𝑊ℎ𝑎𝑡’𝑠 𝑡ℎ𝑎𝑡 20 𝑏𝑦𝑡𝑒 𝑝𝑢𝑏𝑘𝑒𝑦 ℎ𝑎𝑠ℎ?
𝐸𝑎𝑟𝑙𝑖𝑒𝑟 𝑤𝑒 𝑠𝑎𝑤 𝑒𝑎𝑐ℎ 𝑜𝑢𝑡𝑝𝑢𝑡 ℎ𝑎𝑠 𝑎 𝑠𝑐𝑟𝑖𝑝𝑡𝑃𝑢𝑏𝐾𝑒𝑦 (𝑟𝑢𝑙𝑒𝑠 𝑓𝑜𝑟 ℎ𝑜𝑤 𝑡𝑜 𝑠𝑝𝑒𝑛𝑑 𝑡ℎ𝑒 𝑜𝑢𝑡𝑝𝑢𝑡). 𝐴𝑙𝑠𝑜, 𝑟𝑒𝑐𝑎𝑙𝑙 𝑡ℎ𝑎𝑡 𝑡ℎ𝑒 𝑖𝑛𝑝𝑢𝑡 𝑡𝑜 𝑜𝑛𝑒 𝑡𝑟𝑎𝑛𝑠𝑎𝑐𝑡𝑖𝑜𝑛 𝑖𝑠 𝑡ℎ𝑒 𝑜𝑢𝑡𝑝𝑢𝑡 𝑓𝑟𝑜𝑚 𝑎𝑛𝑜𝑡ℎ𝑒𝑟.
𝑇ℎ𝑒 20 𝑏𝑦𝑡𝑒 𝑝𝑢𝑏𝑘𝑒𝑦 ℎ𝑎𝑠ℎ 𝑖𝑠 𝑒𝑥𝑡𝑟𝑎𝑐𝑡𝑒𝑑 𝑓𝑟𝑜𝑚 𝑡ℎ𝑒 𝑐𝑜𝑟𝑟𝑒𝑠𝑝𝑜𝑛𝑑𝑖𝑛𝑔 𝑜𝑢𝑡𝑝𝑢𝑡'𝑠 𝑠𝑐𝑟𝑖𝑝𝑡𝑃𝑢𝑏𝐾𝑒𝑦.
Here’s the 𝐬𝐜𝐫𝐢𝐩𝐭𝐂𝐨𝐝𝐞 for the example we’re working on:
𝑊ℎ𝑎𝑡’𝑠 𝑡ℎ𝑎𝑡 20 𝑏𝑦𝑡𝑒 𝑝𝑢𝑏𝑘𝑒𝑦 ℎ𝑎𝑠ℎ?
𝐸𝑎𝑟𝑙𝑖𝑒𝑟 𝑤𝑒 𝑠𝑎𝑤 𝑒𝑎𝑐ℎ 𝑜𝑢𝑡𝑝𝑢𝑡 ℎ𝑎𝑠 𝑎 𝑠𝑐𝑟𝑖𝑝𝑡𝑃𝑢𝑏𝐾𝑒𝑦 (𝑟𝑢𝑙𝑒𝑠 𝑓𝑜𝑟 ℎ𝑜𝑤 𝑡𝑜 𝑠𝑝𝑒𝑛𝑑 𝑡ℎ𝑒 𝑜𝑢𝑡𝑝𝑢𝑡). 𝐴𝑙𝑠𝑜, 𝑟𝑒𝑐𝑎𝑙𝑙 𝑡ℎ𝑎𝑡 𝑡ℎ𝑒 𝑖𝑛𝑝𝑢𝑡 𝑡𝑜 𝑜𝑛𝑒 𝑡𝑟𝑎𝑛𝑠𝑎𝑐𝑡𝑖𝑜𝑛 𝑖𝑠 𝑡ℎ𝑒 𝑜𝑢𝑡𝑝𝑢𝑡 𝑓𝑟𝑜𝑚 𝑎𝑛𝑜𝑡ℎ𝑒𝑟.
𝑇ℎ𝑒 20 𝑏𝑦𝑡𝑒 𝑝𝑢𝑏𝑘𝑒𝑦 ℎ𝑎𝑠ℎ 𝑖𝑠 𝑒𝑥𝑡𝑟𝑎𝑐𝑡𝑒𝑑 𝑓𝑟𝑜𝑚 𝑡ℎ𝑒 𝑐𝑜𝑟𝑟𝑒𝑠𝑝𝑜𝑛𝑑𝑖𝑛𝑔 𝑜𝑢𝑡𝑝𝑢𝑡'𝑠 𝑠𝑐𝑟𝑖𝑝𝑡𝑃𝑢𝑏𝐾𝑒𝑦.
Here’s the 𝐬𝐜𝐫𝐢𝐩𝐭𝐂𝐨𝐝𝐞 for the example we’re working on:
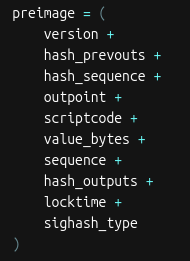
 Lastly, three important hashes are required.
The first is 𝐡𝐚𝐬𝐡𝐏𝐫𝐞𝐯𝐨𝐮𝐭𝐬. It’s the double SHA256 hash of all input outpoints (outpoint = the transaction id + output index)
The second is 𝐡𝐚𝐬𝐡𝐒𝐞𝐪𝐮𝐞𝐧𝐜𝐞, the double SHA256 hash of all input sequence numbers.
The third is 𝐡𝐚𝐬𝐡𝐎𝐮𝐭𝐩𝐮𝐭𝐬, the double SHA256 hash of all outputs.
That’s everything (finally!). Let’s put it all together into something that can be signed!
When signing a transaction, the spender actually signs a hash of the transaction data, not the entire transaction itself. This hash is called the 𝐬𝐢𝐠𝐡𝐚𝐬𝐡.
The data used to create the sighash is called the 𝐩𝐫𝐞𝐢𝐦𝐚𝐠𝐞.
For a transaction input, the preimage is made of these items:
Lastly, three important hashes are required.
The first is 𝐡𝐚𝐬𝐡𝐏𝐫𝐞𝐯𝐨𝐮𝐭𝐬. It’s the double SHA256 hash of all input outpoints (outpoint = the transaction id + output index)
The second is 𝐡𝐚𝐬𝐡𝐒𝐞𝐪𝐮𝐞𝐧𝐜𝐞, the double SHA256 hash of all input sequence numbers.
The third is 𝐡𝐚𝐬𝐡𝐎𝐮𝐭𝐩𝐮𝐭𝐬, the double SHA256 hash of all outputs.
That’s everything (finally!). Let’s put it all together into something that can be signed!
When signing a transaction, the spender actually signs a hash of the transaction data, not the entire transaction itself. This hash is called the 𝐬𝐢𝐠𝐡𝐚𝐬𝐡.
The data used to create the sighash is called the 𝐩𝐫𝐞𝐢𝐦𝐚𝐠𝐞.
For a transaction input, the preimage is made of these items:
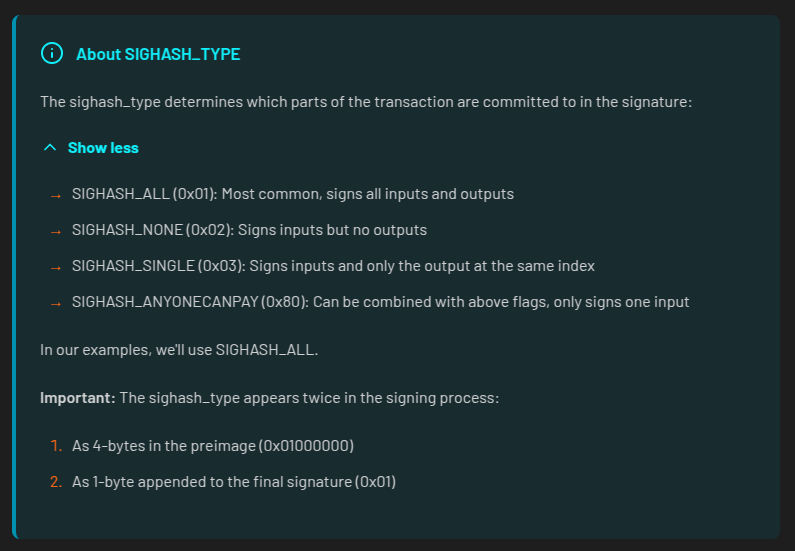
 The sighash_type indicates which parts of the transaction the signature is committing to.
 After hashing the preimage twice with SHA-256, we’re left with the sighash.
At last! It’s time to do some signing!
After hashing the preimage twice with SHA-256, we’re left with the sighash.
At last! It’s time to do some signing!
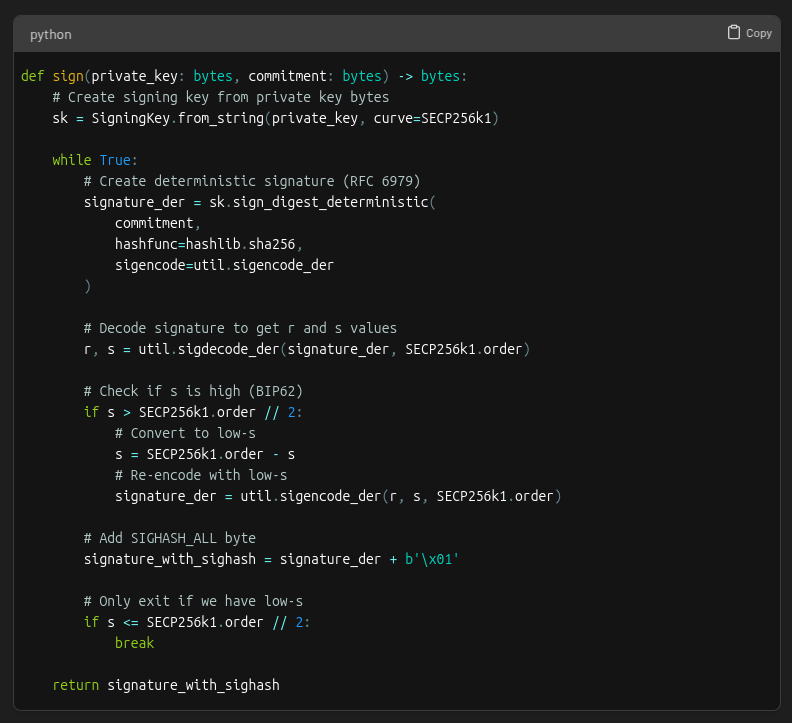
 There are a few steps for signing a segwit (v0) transaction.
First, the signer’s private key is used to create an ECDSA signature for the sighash.
The resulting signature has two parts, 𝑟 and 𝑠.
In ECDSA, there are actually two valid s values for every signature: a "high" value and a "low" value.
Both are mathematically valid, but bitcoin requires using the low s value to prevent transaction malleability (that means altering a transaction's ID!)
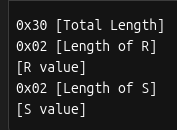
After selecting the low s value, the signature must be encoded into DER format. This is how it’s structured:
There are a few steps for signing a segwit (v0) transaction.
First, the signer’s private key is used to create an ECDSA signature for the sighash.
The resulting signature has two parts, 𝑟 and 𝑠.
In ECDSA, there are actually two valid s values for every signature: a "high" value and a "low" value.
Both are mathematically valid, but bitcoin requires using the low s value to prevent transaction malleability (that means altering a transaction's ID!)
After selecting the low s value, the signature must be encoded into DER format. This is how it’s structured:
 And here’s what the DER encoded signature looks like for our example:
 The last step is to add a byte at the end for the sighash type. If we look back at the preimage made earlier we see this example is using SIGHASH_ALL (0x01).
The full code for the signing step looks like this:
The last step is to add a byte at the end for the sighash type. If we look back at the preimage made earlier we see this example is using SIGHASH_ALL (0x01).
The full code for the signing step looks like this:
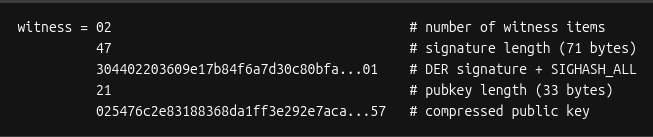
 Remember the transaction witness field we set space aside for? It’s now time to put the signature in it 🚀
 This is how the witness field is structured:
 Which works out to be this for our example:
 With the completion of the witness field, the transaction is now signed!
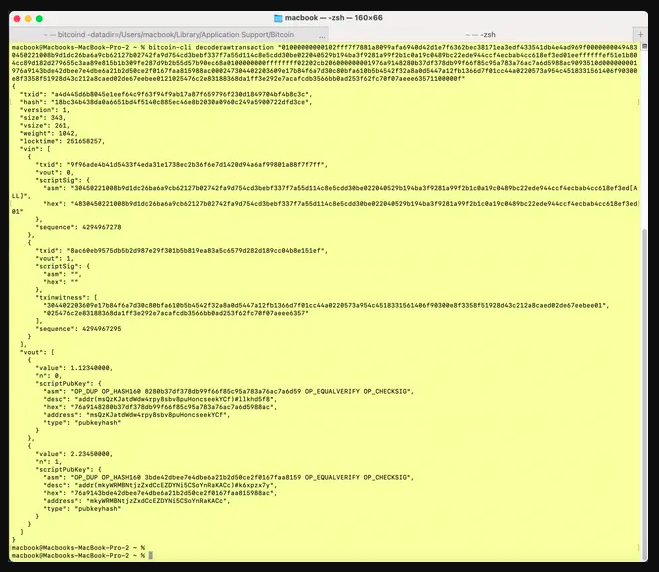
 This is what the final signed transaction hex looks like broken down:
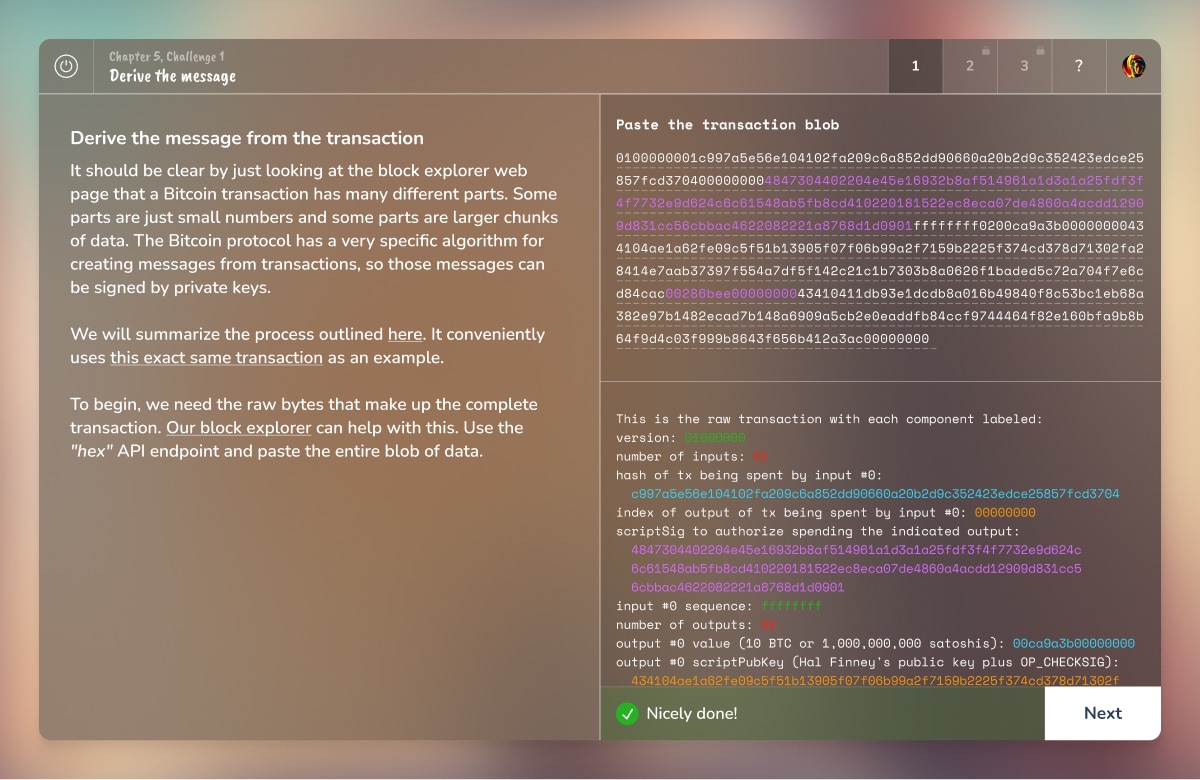
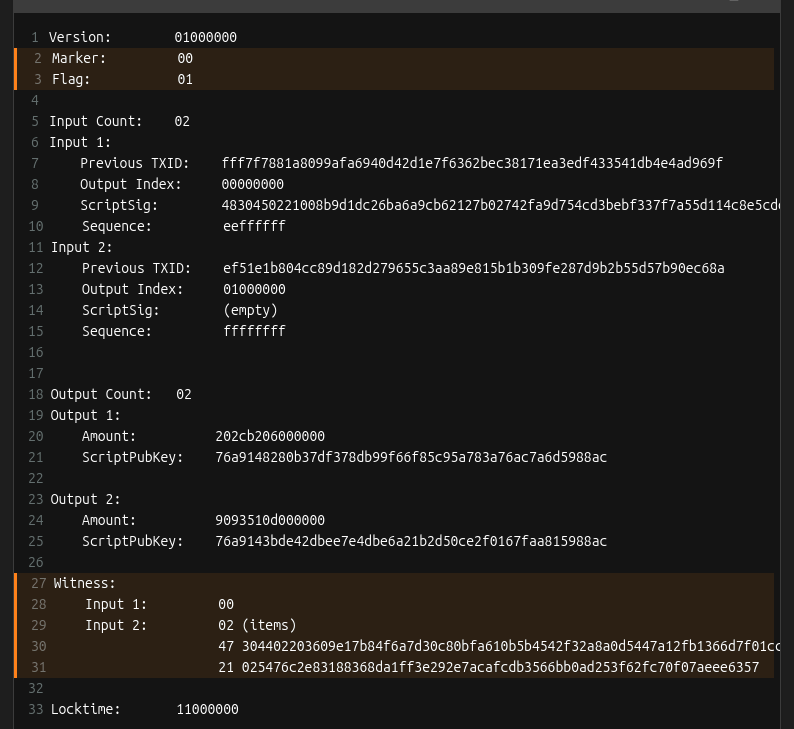 Bonus: You can use the Bitcoin Core CLI decoderawtransaction command to examine all the parts of the raw transaction hex
 * ~ * ~ * ~ * ~ * ~ * ~
If you made it to the end, give yourself a pat on the back. If you enjoyed it, be sure to like this post so we know to make more like it!
* ~ * ~ * ~ * ~ * ~ * ~
This material is from Decoding Bitcoin, your go-to resource for understanding bitcoin, #privacy, and #decentralization.
You can visit
* ~ * ~ * ~ * ~ * ~ * ~
If you made it to the end, give yourself a pat on the back. If you enjoyed it, be sure to like this post so we know to make more like it!
* ~ * ~ * ~ * ~ * ~ * ~
This material is from Decoding Bitcoin, your go-to resource for understanding bitcoin, #privacy, and #decentralization.
You can visit  for the full lesson with all the code examples, as well as more free, interactive content.
For more of a challenge, play chapters 4, 5, and 6 of @Saving Satoshi (
for the full lesson with all the code examples, as well as more free, interactive content.
For more of a challenge, play chapters 4, 5, and 6 of @Saving Satoshi ( ) to learn about public-private key cryptography, digital signatures, and transaction building 😺
 Hope you learned something new about transaction signing. If you enjoyed this, share it with a friend and don’t forget to follow us, @Bitcoin Dev Project for more content like this.
Thanks for reading!
Hope you learned something new about transaction signing. If you enjoyed this, share it with a friend and don’t forget to follow us, @Bitcoin Dev Project for more content like this.
Thanks for reading!
𝑁𝑜𝑡𝑒: 𝑡ℎ𝑖𝑠 𝑒𝑥𝑎𝑚𝑝𝑙𝑒 𝑖𝑠 𝑓𝑜𝑟 𝑎 𝑠𝑒𝑔𝑤𝑖𝑡 𝑣0 𝑡𝑟𝑎𝑛𝑠𝑎𝑐𝑡𝑖𝑜𝑛 𝑠𝑜 𝑠𝑜𝑚𝑒 𝑜𝑓 𝑡ℎ𝑒 𝑠𝑝𝑒𝑐𝑖𝑓𝑖𝑐𝑠 𝑎𝑟𝑒 𝑑𝑖𝑓𝑓𝑒𝑟𝑒𝑛𝑡 𝑓𝑜𝑟 𝑙𝑒𝑔𝑎𝑐𝑦 𝑎𝑛𝑑 𝑡𝑎𝑝𝑟𝑜𝑜𝑡 (𝑠𝑒𝑔𝑤𝑖𝑡 𝑣1) 𝑡𝑟𝑎𝑛𝑠𝑎𝑐𝑡𝑖𝑜𝑛𝑠. 𝐻𝑜𝑤𝑒𝑣𝑒𝑟, 𝑡ℎ𝑒 𝑔𝑒𝑛𝑒𝑟𝑎𝑙 𝑐𝑜𝑛𝑐𝑒𝑝𝑡𝑠 𝑎𝑟𝑒 𝑠𝑡𝑖𝑙𝑙 𝑡ℎ𝑒 𝑠𝑎𝑚𝑒!
The transaction we'll be working with has two inputs. The first is a legacy P2PK input–we won’t be covering that today.
Instead, we’re going to focus on the second input, the P2WPKH (native segwit) one.
Since this example came from one of the BIP-143 test vectors, we know what the final, signed transaction looks like. The goal is to recreate this:
First, we create the base transaction, the transaction without any signatures.
We’ll start with the
- version number
- marker & flag fields (to indicate the tx is segwit)
- locktime
𝐴 𝑛𝑜𝑡𝑒 𝑜𝑛 𝑠𝑒𝑔𝑤𝑖𝑡 𝑣𝑠. 𝑙𝑒𝑔𝑎𝑐𝑦 𝑡𝑟𝑎𝑛𝑠𝑎𝑐𝑡𝑖𝑜𝑛𝑠: 𝐵𝑒𝑐𝑎𝑢𝑠𝑒 𝑎𝑡 𝑙𝑒𝑎𝑠𝑡 𝑜𝑛𝑒 𝑜𝑓 𝑡ℎ𝑒 𝑖𝑛𝑝𝑢𝑡𝑠 𝑖𝑠 𝑠𝑒𝑔𝑤𝑖𝑡 (𝑛𝑎𝑡𝑖𝑣𝑒 𝑜𝑟 𝑤𝑟𝑎𝑝𝑝𝑒𝑑), 𝑡ℎ𝑒 𝑡𝑟𝑎𝑛𝑠𝑎𝑐𝑡𝑖𝑜𝑛 𝑖𝑠 𝑎𝑙𝑠𝑜 𝑐𝑜𝑛𝑠𝑖𝑑𝑒𝑟𝑒𝑑 𝑠𝑒𝑔𝑤𝑖𝑡.
Here’s what we have so far:
Let’s add inputs! Recall that all inputs come from existing transactions. That means for each input, we need to find the transaction it came from and get:
1. that transaction’s ID
2. the output index
𝐖𝐡𝐚𝐭’𝐬 𝐚𝐧 𝐨𝐮𝐭𝐩𝐮𝐭 𝐢𝐧𝐝𝐞𝐱?
Every transaction has a list of outputs. The “output index” is a way to reference a specific output from the list.
We need to ask, "from a transaction’s list of outputs, which one corresponds to the input I care about?”
For each input, two more things are needed: the 𝐬𝐜𝐫𝐢𝐩𝐭𝐒𝐢𝐠 (placeholder for data required to spend the input), and a 𝐬𝐞𝐪𝐮𝐞𝐧𝐜𝐞 𝐧𝐮𝐦𝐛𝐞𝐫 (usually 0xFFFFFFFF)
After adding all the inputs, the transaction looks like this:
Remember when we said the scriptSig would be a placeholder? Here’s why those fields are currently empty:
Time to add outputs! For each output, we include the
- amount (in satoshis)
- scriptPubKey: the locking script that defines the rules for how the output can be spent
Things are starting to come together!
A few more things are needed before we can get to signing. First is setting up the 𝐰𝐢𝐭𝐧𝐞𝐬𝐬 field.
This is where the signature and corresponding public key go for segwit transactions.
The witness field starts off empty. This is different from legacy transactions where signatures are placed directly in the scriptSig field.
The next thing that’s needed is the 𝐬𝐜𝐫𝐢𝐩𝐭𝐂𝐨𝐝𝐞.
The scriptCode for a P2WPKH (pay-to-witness-public-key-hash) input is:
𝑊ℎ𝑎𝑡’𝑠 𝑡ℎ𝑎𝑡 20 𝑏𝑦𝑡𝑒 𝑝𝑢𝑏𝑘𝑒𝑦 ℎ𝑎𝑠ℎ?
𝐸𝑎𝑟𝑙𝑖𝑒𝑟 𝑤𝑒 𝑠𝑎𝑤 𝑒𝑎𝑐ℎ 𝑜𝑢𝑡𝑝𝑢𝑡 ℎ𝑎𝑠 𝑎 𝑠𝑐𝑟𝑖𝑝𝑡𝑃𝑢𝑏𝐾𝑒𝑦 (𝑟𝑢𝑙𝑒𝑠 𝑓𝑜𝑟 ℎ𝑜𝑤 𝑡𝑜 𝑠𝑝𝑒𝑛𝑑 𝑡ℎ𝑒 𝑜𝑢𝑡𝑝𝑢𝑡). 𝐴𝑙𝑠𝑜, 𝑟𝑒𝑐𝑎𝑙𝑙 𝑡ℎ𝑎𝑡 𝑡ℎ𝑒 𝑖𝑛𝑝𝑢𝑡 𝑡𝑜 𝑜𝑛𝑒 𝑡𝑟𝑎𝑛𝑠𝑎𝑐𝑡𝑖𝑜𝑛 𝑖𝑠 𝑡ℎ𝑒 𝑜𝑢𝑡𝑝𝑢𝑡 𝑓𝑟𝑜𝑚 𝑎𝑛𝑜𝑡ℎ𝑒𝑟.
𝑇ℎ𝑒 20 𝑏𝑦𝑡𝑒 𝑝𝑢𝑏𝑘𝑒𝑦 ℎ𝑎𝑠ℎ 𝑖𝑠 𝑒𝑥𝑡𝑟𝑎𝑐𝑡𝑒𝑑 𝑓𝑟𝑜𝑚 𝑡ℎ𝑒 𝑐𝑜𝑟𝑟𝑒𝑠𝑝𝑜𝑛𝑑𝑖𝑛𝑔 𝑜𝑢𝑡𝑝𝑢𝑡'𝑠 𝑠𝑐𝑟𝑖𝑝𝑡𝑃𝑢𝑏𝐾𝑒𝑦.
Here’s the 𝐬𝐜𝐫𝐢𝐩𝐭𝐂𝐨𝐝𝐞 for the example we’re working on:
Lastly, three important hashes are required.
The first is 𝐡𝐚𝐬𝐡𝐏𝐫𝐞𝐯𝐨𝐮𝐭𝐬. It’s the double SHA256 hash of all input outpoints (outpoint = the transaction id + output index)
The second is 𝐡𝐚𝐬𝐡𝐒𝐞𝐪𝐮𝐞𝐧𝐜𝐞, the double SHA256 hash of all input sequence numbers.
The third is 𝐡𝐚𝐬𝐡𝐎𝐮𝐭𝐩𝐮𝐭𝐬, the double SHA256 hash of all outputs.
That’s everything (finally!). Let’s put it all together into something that can be signed!
When signing a transaction, the spender actually signs a hash of the transaction data, not the entire transaction itself. This hash is called the 𝐬𝐢𝐠𝐡𝐚𝐬𝐡.
The data used to create the sighash is called the 𝐩𝐫𝐞𝐢𝐦𝐚𝐠𝐞.
For a transaction input, the preimage is made of these items:
The sighash_type indicates which parts of the transaction the signature is committing to.
After hashing the preimage twice with SHA-256, we’re left with the sighash.
At last! It’s time to do some signing!
There are a few steps for signing a segwit (v0) transaction.
First, the signer’s private key is used to create an ECDSA signature for the sighash.
The resulting signature has two parts, 𝑟 and 𝑠.
In ECDSA, there are actually two valid s values for every signature: a "high" value and a "low" value.
Both are mathematically valid, but bitcoin requires using the low s value to prevent transaction malleability (that means altering a transaction's ID!)
After selecting the low s value, the signature must be encoded into DER format. This is how it’s structured:
And here’s what the DER encoded signature looks like for our example:
The last step is to add a byte at the end for the sighash type. If we look back at the preimage made earlier we see this example is using SIGHASH_ALL (0x01).
The full code for the signing step looks like this:
Remember the transaction witness field we set space aside for? It’s now time to put the signature in it 🚀
This is how the witness field is structured:
Which works out to be this for our example:
With the completion of the witness field, the transaction is now signed!
This is what the final signed transaction hex looks like broken down:
Bonus: You can use the Bitcoin Core CLI decoderawtransaction command to examine all the parts of the raw transaction hex
* ~ * ~ * ~ * ~ * ~ * ~
If you made it to the end, give yourself a pat on the back. If you enjoyed it, be sure to like this post so we know to make more like it!
* ~ * ~ * ~ * ~ * ~ * ~
This material is from Decoding Bitcoin, your go-to resource for understanding bitcoin, #privacy, and #decentralization.
You can visit The Bitcoin Dev Project
Signing Transactions
Saving Satoshi
Saving Satoshi
Explore the mysteries of Satoshi and learn about bitcoin along the way.
Hope you learned something new about transaction signing. If you enjoyed this, share it with a friend and don’t forget to follow us, @Bitcoin Dev Project for more content like this.
Thanks for reading!